Router - PFSense v2.1.2+: Difference between revisions
m Camlin moved page PFSense2.1 to Router - PFSense2.1: Changing to follow the name convention that seems to have been used so far... |
m Camlin moved page Router - PFSense2.1 to Router - PFSense v2.1.2+ |
||
(No difference)
| |||
Revision as of 20:40, 23 April 2014
This is a short guide on getting a pfSense 2.1.2+ system to connect to AAISP as a dual stack router and firewall (Note however this is just the way I have setup my system, and should be used only as guidance) .
Introduction
At the time of writing this wiki page, the pfSense version used was 2.1.2 and it is recommended that you use that version (or a later one) as 2.1.0 and 2.1.1 are affected by the heartbleed and some PPoE config bugs.
Now, although pfSense 2.1 introduces a lot a very interesting new capabilities, it is admittedly still a big buggy when it comes to PPoE (which can be a concern in the UK as it is quite common). In that regards, the old 2.0-IPv6 beta range was a lot more stable, however it was its IPv6 support that was in turn rather flaky. This is why the old wiki page (See Router_-_PFSense_(beta_2.1)) could still be a valid option (unless your security rules dictates you must be on the latest).
Finally, please note that this was tested on an A&A ADSL line connected via TalkTalk Wholesale. I would expect it to work the same when behind BT Wholesale, but your mileage may vary.
Hardware
As described in the previous version of this document (See Router_-_PFSense_(beta_2.1)), a Vigor 120 ADSL Modem was used alongside an ALIX board (although things like an old PC or embedded hardware will work too).
It should also work similarly well with other ADSL/VDSL modem as long as you can push PPoE to it (and that it, in turns, pushes it over its own PPoA connection).
On the PC side, you need at least two interfaces, one for LAN and one for WAN. This can be physical interfaces (easiest option) or can also be done by using 802.1Q VLANs to make one NIC into several.
Software
As, indicated, at the time of writing (23rd of April 2014), you need a copy of pfSense 2.1.2 (embedded variant or not, just check the pfSense website to check which option will suit you best).
Addressing
For IPv6, AAISP supply you with a /48 prefix from which you can create multiple /64 subnets for your use. There are over 65,000 /64 subnets in a /48 each with more addresses than you can eat! Click on the green "add /64" button on your control page to create them.
For IPv4, note down the single /32 address and additional subnet range that you should have been assigned. The single address is the router's external address and the subnet is your LAN.
Configuration
Vigor
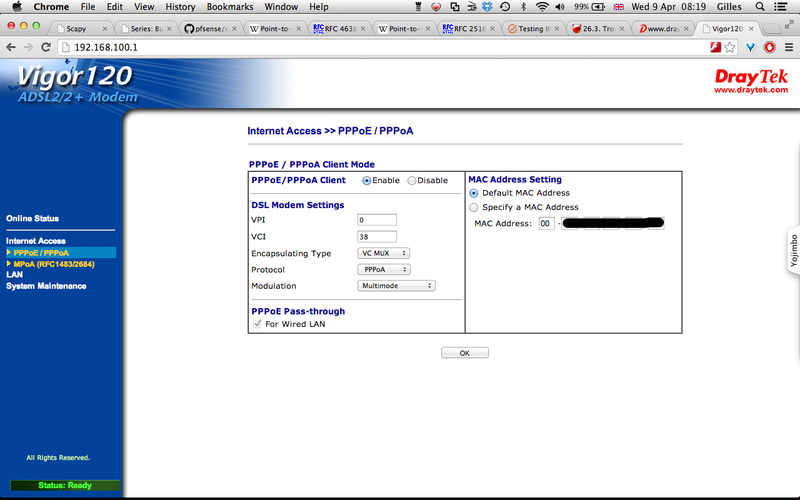
The good thing is that a UK variant of the Vigor 120 modem will typically works just fine with its factory settings (so an easy way to get it quickly ready could be to just hard reset the thing).
You don't need to enter your A&A username and password there as this will be done in pfSense (when setting PPoE).
Now, it could still be an idea to check the settings and change the default password. In which case, just plug the Vigor into a PC, point a browser at it (typically will be listening on 192.168.1.1) and follow the user docs. If you check the web front end, make sure that it gets SHOWTIME for ADSL (otherwise it means you have a problem with the ADSL connection to start with).
Note: Interestingly, I tried the RFC1483 mode and it seems to work ok too (although when I do, pfSense then seems to be taking to an Ericsson box instead of the usual Cisco one). But this is definitively uncharted territories and most likely not supported...
REST OF WIKI PAGE STILL TO BE DONE...
pfSense
Follow one of the many guides out there. It can be tricky to work out which interface is which, so plug one in, configure it at the initial console based interface setup stage, give it an IP address from your LAN range and set the mask. Then try and ping it after putting another address from the range temporarily on a PC or whatever. If it doesn't work then move the LAN cable into another NIC and see if that works. Once LAN is sorted, fire up a browser and point it at the LAN address and carry on the configuration from there. Username: admin, password: pfsense. I recommend you move the web GUI port to another port and enable SSL. There's a built in certificate generator so there is no excuse.
