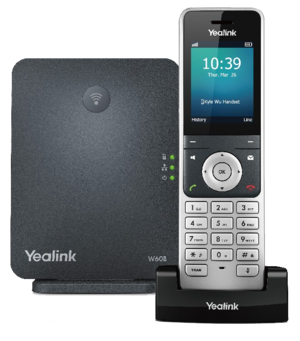
VoIP Phones - Yealink DECT

Configuring Yealink DECT phone for AAISP
Relevant to: Yealink W60B
The Yealink W60B is a DECT base station aimed at small and medium-sized businesses, is perfectly suitable for home use too. Its main specifications are:
- Up to 8 handsets
- Up to 8 SIP accounts
- Up to 8 simultaneous calls
- Support for additional 'DECT repeaters'
- IPv4 and IPv6
- PoE or Mains plug for power
- Transfer button (allows assistited or blind transfers to other SIP extensions/external numbers)
Credentials
| As shipped / unconfigured | Once configured | |
|---|---|---|
| IP: | DHCP | DHCP |
| Username: | admin | |
| Password: | admin | contact us |
IP address
By default the Yealink base unit picks up an IP address using DHCP. You can find the IP address from the Handset:
Press OK –> Select the ‘i’ icon (Status) -> select ‘Base’ -> the IP will be shown
Yealink and Voiceless Settings
On the web interface, go to:
Account ->
| Yealink Settings | |
|---|---|
| Setting | Value |
| Line Active | Enabled |
| Label | AAISP (or what ever you like) |
| Display Name | Your Name (or what ever you like) |
| Register Name | Your phone number, +44... |
| Username | Your phone number, +44... |
| Password | Your SIP password |
| Server Host | voiceless.aa.net.uk |
| Server Expires | 600 |
Check the SIP registration status:
Go to:
Status -> Yealink_W53P_SIP_Config.png
You should the the account Status as 'Registered'
Handset Assignmnent
Here you can assign which of your (up to) 8 SIP accounts are to ring which of your (up to) 8 handsets!
Account -> Number Assignment
Other optonal settings
Features -> General Information -> Call Waiting --> set to Disabled
Features -> General Information -> Number Of Active Handsets --> Set to 8 (if you have more than 4 handsets)
Features -> General Information -> Fwd International --> set to Disable (no need to allow forwarding to international numbers)
Features -> Phone Lock --> Add 999 to the list of emergency numbers
Settings -> Time&Date -> Time Zone --> 0 GMT
Settings -> Time&Date -> Primary Server --> time.aa.net.uk
Settings -> Time&Date ->  Date Format --> YYYY-MM-DD
Settings -> Tones --> Set to Great Britian
Account -> Handset Name --> Give a name to each handset, will be displayed on their screen
Transfer a call
The handsets, eg the W53H, have a dedicated 'Transfer' button 'TRAN'. This lets you transfer a call to someone else.
Assisted Transfer on a Yealink W53H handset
Say you have an incoming call that you've answered, and you want to transfer it to someone else and introdice the caller as you go...
- Answer the incoming call, and find out who they want to be transferred to
- Press the TRAN button
- At this point the caller is put on hold
- Enter in the extension number or full number of who you want to transfer the call to
- Press the Green dial button
- At this point you will be ringing the third party
- If no answer, then you can press the button under End to go back to the originall caller
- At this point you can also Blind transfer the call, by pressing the button under Transfer
- Once answered, you can introduce the original caller and press the button under Transfer
DND - Do not disturb
You can enable/disable DND via the handset for each of the SIP accounts allocated to the Yealink handset:
OK --> Call Features (orange) --> Do Not Disturb
Firewall & Security
- You will also want to set up firewall rules, as per the VoIP Firewall page.
- Also see the VoIP Security page for information about securing your VoIP service.