Router - PFSense
This is a short guide on getting a pfSense 2.1.2+ system to connect to AAISP as a dual stack router and firewall (Note however this is just the way I have setup my system, and should be used only as guidance) .
Before you start, it would be wise to read IPv6 on AAISP, which explains how IPv6 traffic will be routed to you by AAISP. Key point is that you should expect one /128 address to be assigned to your router, additional subnets will be routed to this address.
Introduction
At the time of writing this wiki page, the pfSense version used was 2.1.2 and it is recommended that you use that version (or a later one) as 2.1.0 and 2.1.1 are affected by heartbleed and some PPPoE config bugs.
Now, although pfSense 2.1 introduces a lot a very interesting new capabilities, it is admittedly still a bit buggy when it comes to PPPoE (which can be a concern in the UK as it is quite common). In that regards, the old 2.0-IPv6 beta range was a lot more stable, however it was its IPv6 support that was in turn rather flaky. This is why the old wiki page (See Router - PFSense (beta 2.1)) could still be a valid option (unless your security rules dictates you must be on the latest).
Finally, please note that this was tested on an A&A ADSL line connected via TalkTalk Wholesale. I would expect it to work the same when behind BT Wholesale, but your mileage may vary.
Hardware
As described in the previous version of this document (See Router - PFSense (beta 2.1)), a Vigor 120 ADSL Modem was used alongside an ALIX board (although things like an old PC or embedded hardware will work too).
It should also work similarly well with other ADSL/VDSL modem as long as you can push PPPoE to it (and that it, in turns, pushes it over its own PPPoA connection).
On the PC side, you need at least two interfaces, one for LAN and one for WAN. This can be physical interfaces (easiest option) or can also be done by using 802.1Q VLANs to make one NIC into several.
Software
As, indicated, at the time of writing (23 April 2014), you need a copy of pfSense 2.1.2 (embedded variant or not, just check the pfSense website to check which option will suit you best).
Addressing
For IPv6, AAISP supply you with a /48 prefix from which you can create multiple /64 subnets for your use. There are over 65,000 /64 subnets in a /48 each with more addresses than you can eat! Click on the green "add /64" button on your control page to create them.
For IPv4, note down the single /32 address and additional subnet range that you should have been assigned. The single address is the router's external address and the subnet is your LAN.
AAISP will supply provider address space. For obvious reasons, this cannot be moved between suppliers. You may wish to consider NAT configuration, which will allow you to use a private address internally. This will avoid the need to readdress should you move supplies, and will also make multi provider WAN easier to deploy, see Multi-WAN for IPv6 on PFSense documentation site
Configuration
Vigor
The good thing is that a UK variant of the Vigor 120 modem will typically works just fine with its factory settings (so an easy way to get it quickly ready could be to just hard reset the thing).
You don't need to enter your A&A username and password there as this will be done in pfSense (when setting PPoE).
Now, it could still be an idea to check the settings and change the default password. In which case, just plug the Vigor into a PC, point a browser at it (typically will be listening on 192.168.1.1) and follow the user docs. If you check the web front end, make sure that it gets SHOWTIME for ADSL (otherwise it means you have a problem with the ADSL connection to start with).
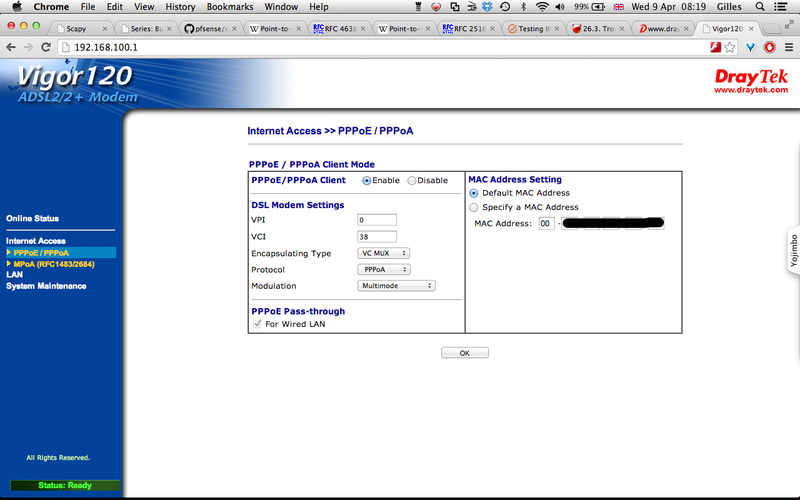
Typically you will be trying to setup the modem in bridge mode so that it receives the PPoE on the NIC port and then pushes that over the ADSL connection (via PPoA, using the usual VC Mux 0/38). In the case of the Vigor 120, the configuration will look like this:
Note: Interestingly, I tried the RFC1483 mode and it seems to work ok too (although when I do, pfSense then seems to be taking to an Ericsson box instead of the usual Cisco one).
Dlink DSL-320B
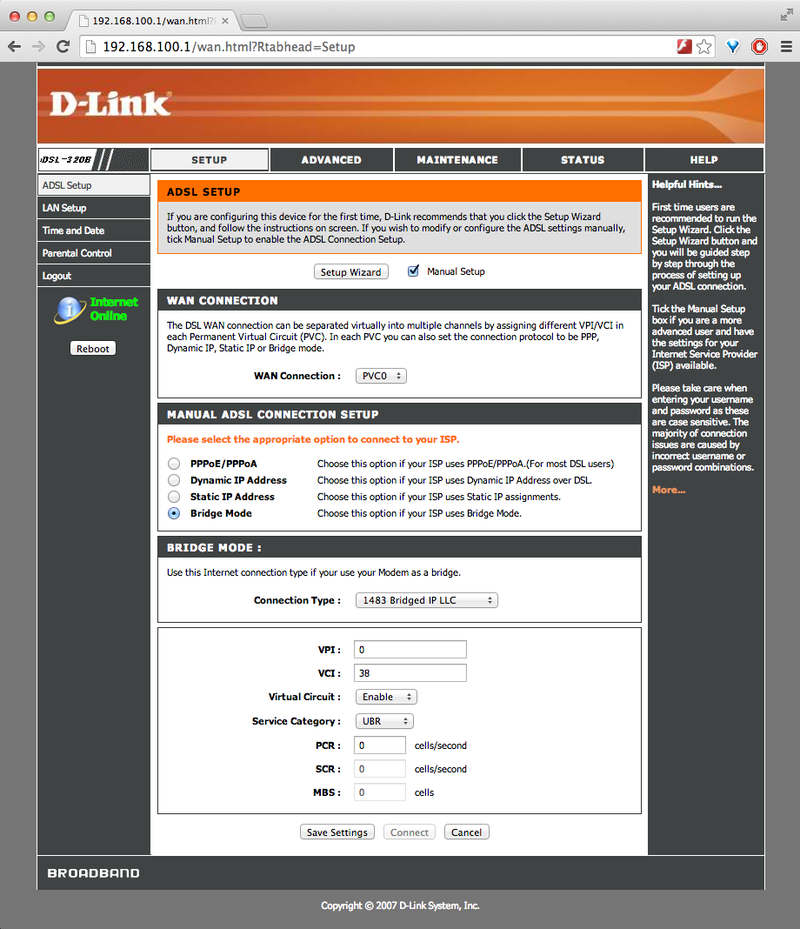
I also tried with a Dlink DSL-320B modem and it worked fine too although it had to be setup in RFC1483 IP LLC bridge mode and the default VCI number had to be changed to 38 (there did not seem to be any PPoE passthrough option over PPoA).
Now, even in bridge mode, it will still be an idea to change the default admin password and disable management services on the WAN side.
Note: The default LAN address was changed to 192.168.100.1 in order to avoid any potential conflicts with the internal network that is behind pfSense.
pfSense
Follow one of the many guides out there. It can be tricky to work out which interface is which, so plug one in, configure it at the initial console based interface setup stage, give it an IPv4 address from your LAN range and set the mask. Then try and ping it after putting another address from the range temporarily on a PC or whatever. If it doesn't work then move the LAN cable into another NIC and see if that works. Once LAN is sorted, fire up a browser and point it at the LAN address and carry on the configuration from there. Username: admin, password: pfsense. I recommend you change the password, move the web GUI port to another port and enable SSL.
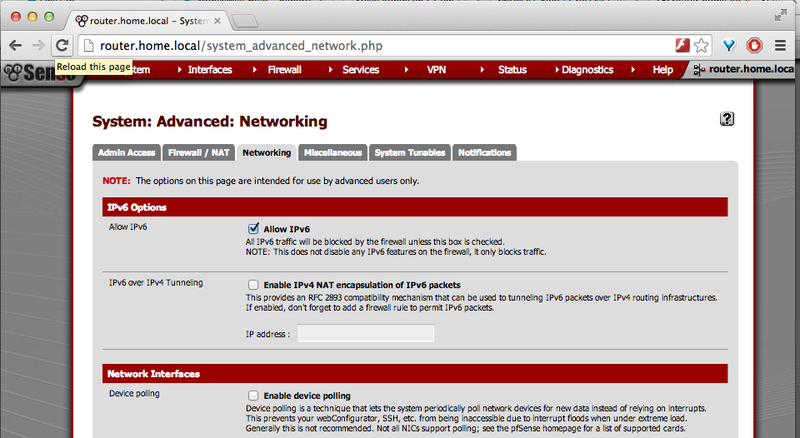
The default firewall settings do not allow inbound access at all (for any protocol). Previous version of pfSense 2.1.2 also used to just discard IPv6 traffic whatever its direction, but this is not true anymore and it should now be processed similarly to IPv4 (firewall rules, etc.). However, this is not always the case when doing an upgrade, so it is worthwhile to check that setting.
That setting is available in the page "System: Advanced: Networking":
Once this is checked, proceed to setup the WAN interface and then update the LAN settings to enable IPv6.
Setting up the WAN
Go to Interfaces -> (assign), then look for the WAN interface (if I remember it should be there by default. If not just click on the "+" button).
Select the network port you want the WAN interface to really use and click save.
Then click on the WAN interface name (i.e. click on "WAN" if you have called it like that) and enable it.
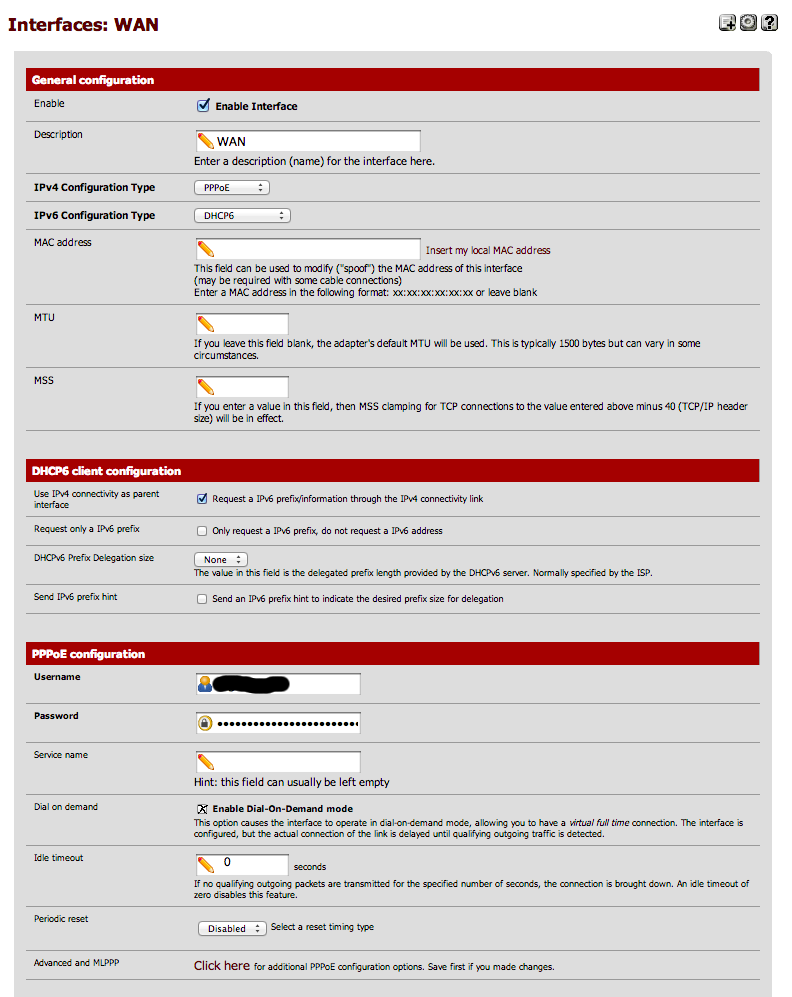
For the IPv4 configuration type select "PPoE". And for the IPv6 Configuration Type select "DHCP6".
Ensure that "Use IPv4 connectivity as parent interface" is selected.
In the PPoE configuration section enter your username and password (as given by A&A) and ensure that "dial on demand" is validated and that the idle timeout is set to 0.
You should get a configuration screen similar to this:
Note that you should not use the prefix delegation configuration; AAISP will issue you a single /128 and then route additional subnets to this address.
Finally, click on the save button.
Note: In previous versions of pfSense (2.1.0 and 2.1.1) this was a bit buggy and pfSense was getting mixed up in the PPoE interface assignment. So you often had to manually define the PPoE interface by creating it in the PPP tab of the "Interfaces -> (assign)" page. But this seems to work reasonably well now.
Updating the LAN settings
Go again in the "Interfaces" top menu, and select "LAN".
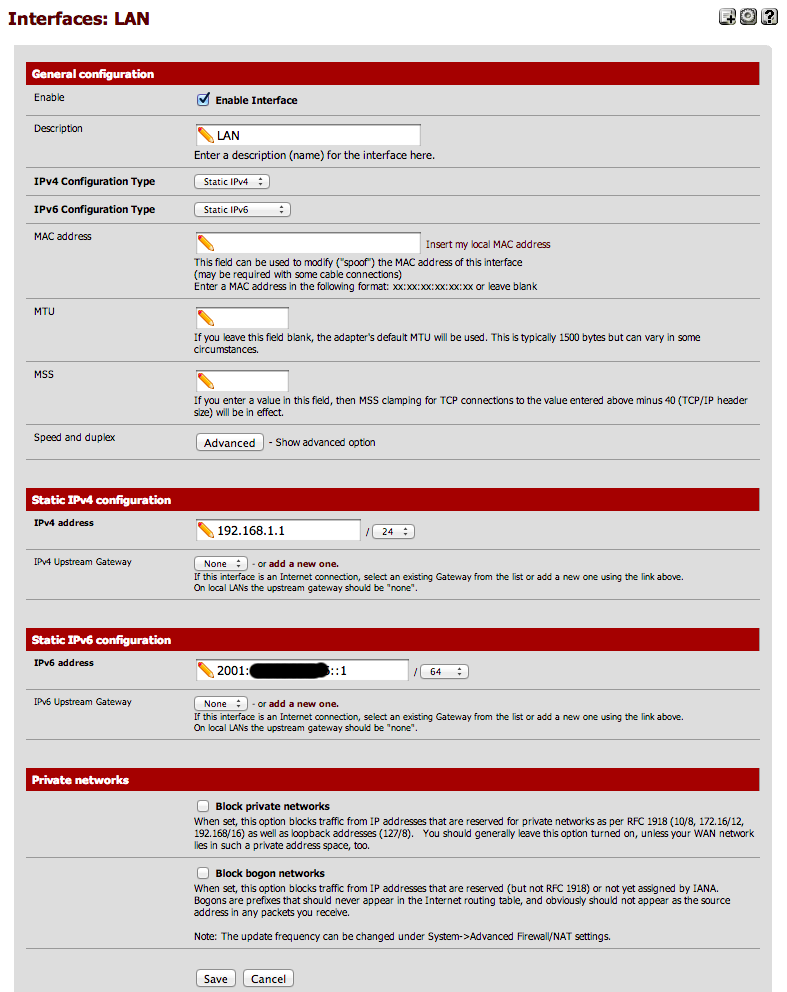
Once there, ensure that the IPv6 configuration type is set to "Static IPv6".
AAISP will have given you an IPv6 prefix, i.e. something like: 2001:8b0:XXXX:YYYY::/64
Use one address of that prefix and assign as the IPv6 address of the LAN port. This address will have to be outside of the range you will allocate to DHCP6 for the LAN side. A suggestion could be something like:
2001:8b0:XXXX:YYYY::1
Then update the bitmask to match your IPv6 assignment (typically 64, but could be 48 if you are trying to route your full allocation).
You should end up with a configuration screen similar to this one:
Finally, click the save button.
Enable DHCPv6
At this stage your PPoE WAN interface will have obtained an IPv6 address from AAISP (something in the range of 2001:8b0:1111:1111::/64 but it is not visible unless you connect to the router via ssh and do an "ifconfig").
Your LAN network will in turn use the IPv6 range you have been assigned by AAISP (remember, in IPv6 there is no NAT and the like, all your devices are directly routable and this is why the IPv6 range you have been given applies inside the LAN, and not outside. This is also why your PPoE interface get its address from a completely different range. It is just a "hop" to your network).
Now we had to use a bit of that range for the LAN address of the router itself (the 2001:8b0:XXXX:YYYY::1 address set previously). So whilst we are at it, let's reserve some of the address for static use (i.e. not DHCP6). The easiest is to say that all addresses in the 2001:8b0:XXXX:YYYY:0000:://80 range are statically assigned. This means the static range has 2^48 addresses available, which could seem a bit excessive, but who cares, with IPv6 we have more addresses than atoms in the universe :-)
We can then assign the rest of your block to DHCPv6. So the following range will be given to DHCPv6:
2001:8b0:XXXX:YYYY::1:0000 to 2001:8b0:XXXX:YYYY:ffff:ffff:ffff:ffff
So, select "Services -> DHCPv6 Server/RA" and then enter the appropriate information. Once done and saved, the screen should look like this:
I suspect there will be no real need to reserve a part of this range as if you need to create fancy subnetworks then you just need to use another one of your /64 blocks (and you have been given 65536 of them, that should be enough!). But in any case, pfSense allows to subdivide the block further if you need to (see the "subnets" options).
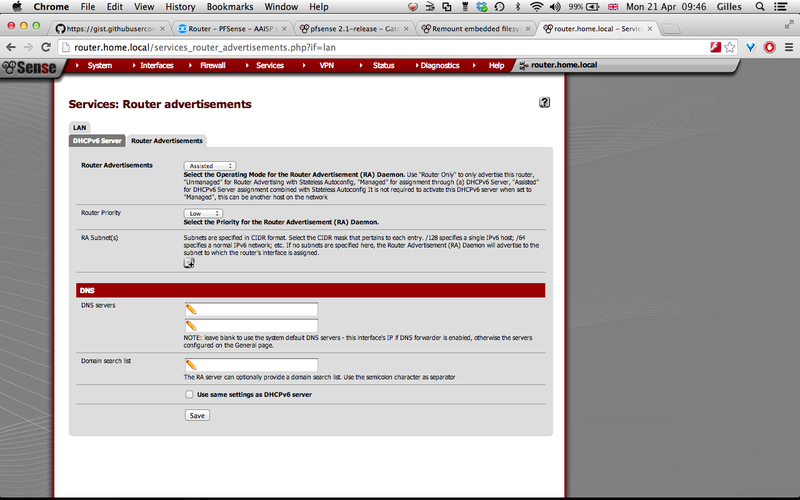
Once this is done, it is then necessary to activate the router advertisements (RA), so select the "Router Advertisements" tab and then use the "Unmanaged" or "Assisted" mode. I tend to use "Assisted" because it allows me to do static DHCP assignment for some of my machines (although this is quite a pain at present as it is based on DUID and not MAC addresses).
The configuration screen will be similar to this (don't forget to save!):
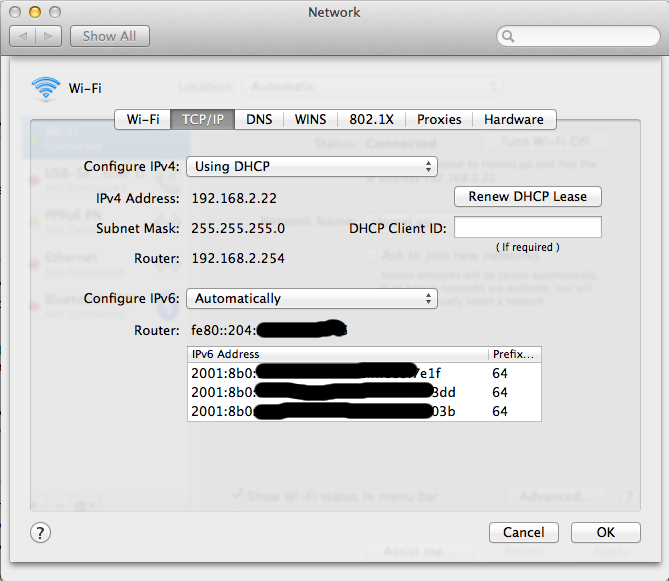
Once this is done, you should see that your machine has now acquired a nice and shinny new routable IPv6 address. In fact, it will often acquire more than one depending of the RA mode you have selected and the privacy modes activated by the client machine.
Yeaahhh!! Victory!
Note: On some old hardware/OS it is not impossible you could have to unplug/plug the network cable for the machine to pick up the change.
Check the firewall rules for outgoing from LAN
If I remember correctly, pfSense will by default create the outgoing rules for the LAN (especially if you used the wizard). But just in case, go into the "Firewall -> Rules" page and check that you have at least the following entries:
Happy with your new IPv6 address and firewall rules, you then fire your browser and try to go somewhere when it suddenly becomes a "Houston we have a problem" moment...
Fix the PPoE DNS problem
The problem is that the PPoE stuff is still a bit flaky in 2.1.2, and although the PPoE negotiation itself is fine, it seems pfSense will often lose the ISP DNS settings (this seems to be a timing related issue of some kind, so sometimes it works and sometimes it does not. You can even get into situations where the DNS setting is there and then it suddenly disappear!).
Arghhhh!!!!!
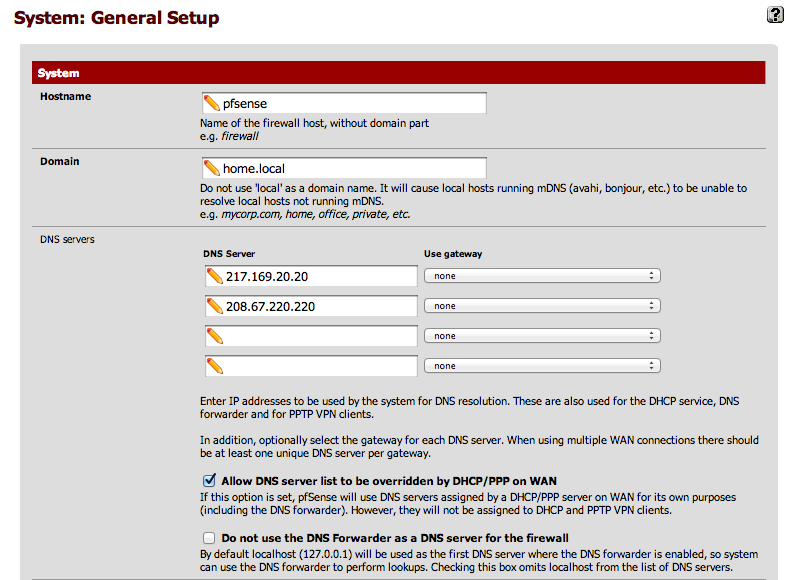
Now, an easy way to fix this is to force pfSense to use specific DNS servers. This is done in the "System -> General Setup" page. Ideally you should set your ISP DNS server in there and/or some public ones like Google (8.8.8.8) or OpenDNS (208.67.220.220).
Testing internet access
You can now fire a browser and check your public IPv4 and IPv6 address by going to the http://ip4.me or http://ip6.me websites.
Fix the Gateway monitoring problems
Although you can now go on the internet fine, If you look at the RRD graphs or consult the gateway status page you will notice the status is either marked as offline or unknown.
This is a case because the script currently configuring apinger (the process that monitors the gateways) is buggy and currently does not cope very well with PPoE (when it used to be perfectly fine in pfSense 2.0.x).
Another problem is that for IPv6 the AAISP gateway will currently not reply to pings on its local link address (and it is the one used for routing the traffic, so it is reachable!). So you have to manually set the monitor address to be 2001:8b0:0:81::51bb:51bb (which is the IPv6 address of clueless.aa.net.uk). But even that won't initially work because even if you set the routable address, apinger is told to use the local link address as the source, meaning you will never get the response... (This seems to be fixed in 2.3.3, however you will still need to configure the monitoring address to bottomless. It's also possible simply to disable monitoring if you do not have multiple IPv6 lines coming into the PFSense box)
So it is necessary to change /etc/inc/gwlb.inc with these two fixes and then it will work. These fixes have been added to pfSense (See https://github.com/pfsense/pfsense/pull/1098) so they will make it in a future version but in the meantime they are described here: https://forum.pfsense.org/index.php?topic=69533.msg411732#msg411732
Once this is done, you will just have to go in "System->Routing" and then edit the WAN_DHCP6 gateway settings to make them as follow:
If successful in the script and settings changes you will then get a Gateway Status screen similar to this:
Note: Sometimes, after link failure, the script will still fail to setup apinger properly (especially for IPv6. IPv4 will typically be ok). This seems to be caused by some timing issues whereby pfSense calls the script too early. Fixing this will probably require a more serious rework of that area in pfSense.
