
FireBrick Road Warrior Windows 10
Windows setup
The following instructions were tested on a Windows 10 system. Setup on other versions of Windows will be similar, but the dialogs and messages seen may not be exactly as shown here.
The CA certificate needs to be installed on the Windows machine using an account with administrator privileges.
First, download the CA certificate in DER format to the Windows machine. The easiest way to do this is to use a browser to visit your FireBrick certificate management page, and click on the Download DER link corresponding to the CA certificate. Save it in a suitable location on the Windows machine. Note that you must download the certificate in DER format - windows machines do not recognize PEM format. The file will be given the .crt extension.
Install the certificate
- Download DER format
- Click on the file, you may get a Warning (see screenshot)
- The certificate will be opened, Click install certificate
- The 'Welcome to the Certificate Import Wizard' screen opens, select Local Machine, then Next (see screenshot)
- You will be prompted to enter in the Administrator password of the computer, do this.
- Select ' Place all certificates in the following store' (see screenshot)
- Click Browse
- Select 'Trusted Root Certification Authorities', click OK. (see screenshot)
- You'll now be back at the screen you were on previously, Click Next (see screenshot)
- The 'Completing the Certificate Import Wizard' screen shows, Click Finish (see screenshot)
- A little window pops up saying 'The import was successful' (see screenshot)
- Screenshots of installing the certificate on Windows 10
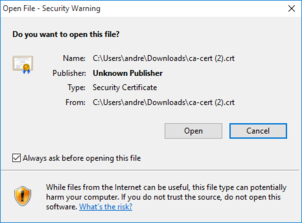
Click on the file, you may get a Warning
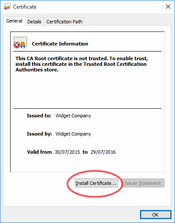
The certificate will be opened, Click install certificate

The 'Welcome to the Certificate Import Wizard' screen opens, select Local Machine, then Next
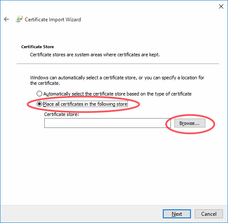
Select ' Place all certificates in the following store', Click Browse

Select 'Trusted Root Certification Authorities', click OK.

The 'Completing the Certificate Import Wizard' screen shows

A little window pops up saying 'The import was successful'


Configure the VPN
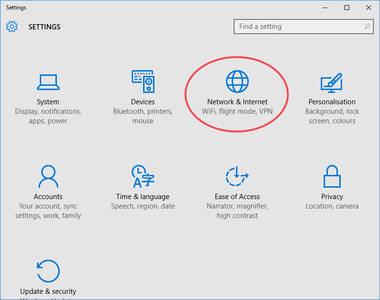
- Click the Start/Windows icon
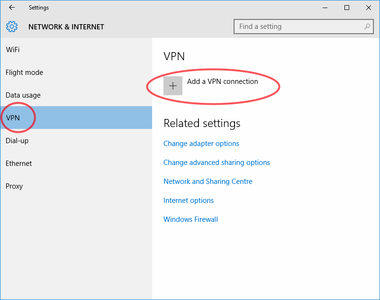
- Go to Settings (see screenshot)
- Click 'Network & Internet'
- Click VPN (see screenshot)
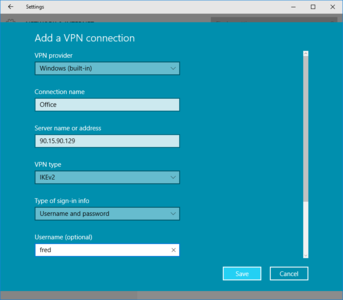
- Click 'Add a VPN connection'
- Enter in the VPN settings eg: (see screenshot)
- VPN Provider: Windows (built in)
- Connection name: (What ever you like, eg Office)
- Server name or address: The IP or host name of your FireBrick
- VPN type: IKEv2
- Type of sign-in info: Username and password
- Username & Password (as set up on the FireBrick). This is optional, you can leave blank and Windows will prompt you for this information each tie you connect.
- Click OK
- Your VPN connection will now be added (see screenshot)
- Screenshots of configuring the VPN on Windows 10
Click the Start/Windows icon, Go to Settings, Click 'Network & Internet', Click Add
Enter in the VPN settings
The VPN will then be added
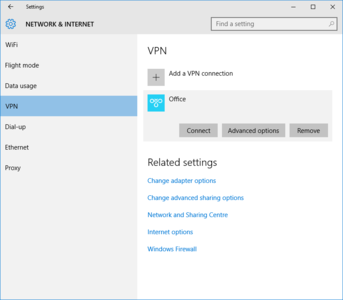
You can now click Connect
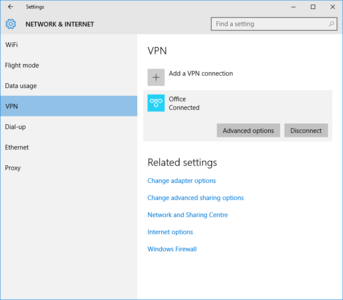
VPN Connected!


Connect
You should now be ready to connect - There are a few ways to connect, the easiest is to click on the Network icon near the clock, and the VPN connection should be at the top of the list. Otherwise, you can connect via:
Start/Windows icon -> Settings -> Network & Internet -> VPN
If not already saved, you'll use the username and password as set up in the EAP Identity on the FireBrick (in this example, we had set up a user of fred with a password)
You probably want to change the type of network to Work Network after the connection establishes.