
FireBrick Road Warrior iPhone iPad iOS8: Difference between revisions
m (→iPhone Profile) |
mNo edit summary |
||
| (17 intermediate revisions by 2 users not shown) | |||
| Line 1: | Line 1: | ||
<indicator name="RoadW">[[File:Menu-Road-Warrior.svg|link=:Category: |
<indicator name="RoadW">[[File:Menu-Road-Warrior.svg|link=:Category:FireBrick IPsec Road Warrior|30px|Back up to the FireBrick Road Warrior Category Page]]</indicator> |
||
| ⚫ | |||
= THIS IS NOW LEGACY INFORMATION. USE LATEST IOS AND LETS ENCRYPT CERTS = |
|||
=iOS 8= |
|||
| ⚫ | '''Older iPhone and iPad devices running iSO 8''' need a 'profile file' to be generated and then sent to the device. This file contains the IPsec details. FireBrick has a bash script that can be used (on a linux or windows machine with cygwin) to generate the file. This are easier in iOS 9. If you are running iOS9 then see the [[FireBrick Road Warrior iPhone iPad iOS9|iOS 9 Page]]. |
||
==make-profile tool== |
==make-profile tool== |
||
| Line 6: | Line 10: | ||
http://www.firebrick.co.uk/tools/make-profile |
http://www.firebrick.co.uk/tools/make-profile |
||
You may need the package uuid-runtime if you get the error 'uuidgen: command not found' |
|||
| ⚫ | |||
| ⚫ | |||
Each iPhone needs a profile file specific to that user. Once created you can email this, or make a web link to it, and the iPhone will recognise it and allow it to be installed. Let's call it <tt>fred.mobileconfig</tt> for our user called ''fred'' as in the above example config. |
Each iPhone needs a profile file specific to that user. Once created you can email this, or make a web link to it, and the iPhone will recognise it and allow it to be installed. Let's call it <tt>fred.mobileconfig</tt> for our user called ''fred'' as in the above example config. |
||
| Line 16: | Line 22: | ||
#Once the .mobileconfig file has been generated: |
#Once the .mobileconfig file has been generated: |
||
#Email the file to the iDevice. |
#Email the file to the iDevice. |
||
#The file should open in the 'Install Profile' app |
#The file should open in the 'Install Profile' app (Screenshot below) |
||
#Tap Install |
#Tap Install |
||
#Tap You'll be asked to review and then enter your pin (if you have one for the device) |
#Tap You'll be asked to review and then enter your pin (if you have one for the device) (Screenshot below) |
||
#Tap Install, and then Install again (yes the Third tap!) |
#Tap Install, and then Install again (yes the Third tap!) |
||
#Enter your password for the IPsec account (this is the one as set up in the EAP Identity on the FireBrick (in this example, we had set up a user of fred with a password) |
#Enter your password for the IPsec account (this is the one as set up in the EAP Identity on the FireBrick (in this example, we had set up a user of fred with a password) (Screenshot below) |
||
#Tap next |
#Tap next |
||
#Tap Done |
#Tap Done |
||
| ⚫ | |||
Go to: |
|||
| ⚫ | |||
==Screenshots== |
|||
<gallery widths=200px> |
|||
FireBrick-IPsec-iPad-1InstallProfile.jpg|This screen comes up once you click on the profile file to install it |
|||
FireBrick-IPsec-iPad-2passcode.jpg|You'll need to enter in your devices pin code, if you have one set up |
|||
FireBrick-IPsec-iPad-3-cert.jpg|Confirm the Certificate |
|||
FireBrick-IPsec-iPad-4-password.jpg|Enter in the password as configured at the FireBrick side |
|||
FireBrick-IPsec-iPad-5-connect.jpg|Connect to the VPN via Settings and VPN |
|||
| ⚫ | |||
</gallery> |
|||
==Deleting the VPN Profile== |
==Deleting the VPN Profile== |
||
| Line 29: | Line 49: | ||
Setting -> General -> Profile -> Click on your VPN profile -> Click Delete Profile |
Setting -> General -> Profile -> Click on your VPN profile -> Click Delete Profile |
||
| ⚫ | |||
| ⚫ | |||
| ⚫ | |||
| ⚫ | |||
| ⚫ | |||
Latest revision as of 10:32, 23 June 2023
THIS IS NOW LEGACY INFORMATION. USE LATEST IOS AND LETS ENCRYPT CERTS
iOS 8
Older iPhone and iPad devices running iSO 8 need a 'profile file' to be generated and then sent to the device. This file contains the IPsec details. FireBrick has a bash script that can be used (on a linux or windows machine with cygwin) to generate the file. This are easier in iOS 9. If you are running iOS9 then see the iOS 9 Page.
make-profile tool
You can download the script from:
http://www.firebrick.co.uk/tools/make-profile
You may need the package uuid-runtime if you get the error 'uuidgen: command not found'
Install iPhone Profile
Each iPhone needs a profile file specific to that user. Once created you can email this, or make a web link to it, and the iPhone will recognise it and allow it to be installed. Let's call it fred.mobileconfig for our user called fred as in the above example config.
./make-profile SERVER=IP-of-server LOCALID="Fred's iPhone" CA=ca-cert.pem SERVERID=server.example.com USERNAME=fred PROFNAME="Office VPN" VPNNAME=FireBrick fred.mobileconfig
Note that the SERVERID must match the FQDN entry used when making the server certificate, and hence the local-ID in the config for the connection.
- Once the .mobileconfig file has been generated:
- Email the file to the iDevice.
- The file should open in the 'Install Profile' app (Screenshot below)
- Tap Install
- Tap You'll be asked to review and then enter your pin (if you have one for the device) (Screenshot below)
- Tap Install, and then Install again (yes the Third tap!)
- Enter your password for the IPsec account (this is the one as set up in the EAP Identity on the FireBrick (in this example, we had set up a user of fred with a password) (Screenshot below)
- Tap next
- Tap Done
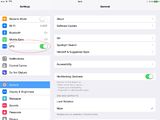
Connect
Go to:
Settings -> VPN - Tap the On/off slider thing
Screenshots
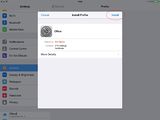
This screen comes up once you click on the profile file to install it
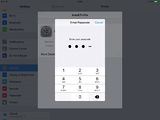
You'll need to enter in your devices pin code, if you have one set up
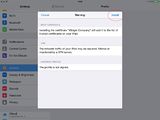
Confirm the Certificate
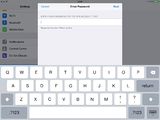
Enter in the password as configured at the FireBrick side
Connect to the VPN via Settings and VPN
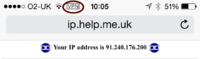
VPN up on an iPhone


Deleting the VPN Profile
Removing the VPN is not as easy as you would think, the settings is actually a profile, so you need to delete the profile via:
Setting -> General -> Profile -> Click on your VPN profile -> Click Delete Profile