
FireBrick Road Warrior iPhone iPad iOS9: Difference between revisions
| Line 28: | Line 28: | ||
FireBrick-IPsec-iPad-CertInstalled.png|The certificate is now installed! |
FireBrick-IPsec-iPad-CertInstalled.png|The certificate is now installed! |
||
</gallery> |
</gallery> |
||
==Add VPN Configuration== |
|||
#Go to: |
|||
Settings -> General -> VPN -> Add VPN Configuration |
|||
#Set the following |
|||
#*Type: |
|||
#*Description |
|||
== VPN Settings == |
== VPN Settings == |
||
Revision as of 09:27, 4 August 2015
iOS 9 is due to be released in Autumn 2015, these notes are based on the Public Beta that Apple have made available.
- If you are running iOS 8 then please see the iOS 8 Page
iOS 8 Vs iOS 9'
The VPN setup is slightly improved in iOS 9. You can still use the iOS 8 instructions which involves creating a 'profile', or you can use the instructions below which involve sending the certificate to the iDevice and then then configuring the VPN though the settings.
Sending the Certificate
You will need to get the CA Certificate on to the iDevice, this can be done in a couple of ways:
- Download the file from the FireBrick - follow the steps below
- Email the certificate to the iDevice - follow the steps below from point 4
Download the file from the FireBrick
- Log in to the FireBrick
- Got to: Config -> Certificates
- Click on the PEM link for the 'CA certificate' (Screenshot below)
- Review the certificate, then Click Install (Screenshot below)
- Enter in your passcode (Screenshot below)
- Click Done
- The certificate is now installed! (Screenshot below)
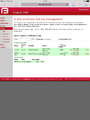
Certificates page on the FireBrick, Click on the PEM link for the 'CA certificate
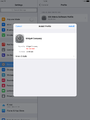
Review the certificate, then Click Install
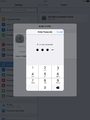
Enter in your passcode
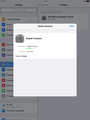
The certificate is now installed!


Add VPN Configuration
- Go to:
Settings -> General -> VPN -> Add VPN Configuration
- Set the following
- Type:
- Description