ZyXEL Port Forwarding: Difference between revisions
m (Andy moved page ZyXEL VMG1312-B10A Port Forwarding to ZyXEL Port Forwarding) |
mNo edit summary |
||
| (4 intermediate revisions by 3 users not shown) | |||
| Line 1: | Line 1: | ||
[[Category:ZyXEL VMG1312-B10A]] |
[[Category:ZyXEL VMG1312-B10A]] |
||
[[Category:ZyXEL VMG1312 B10D]] |
|||
[[Category:ZyXEL VMG3925 B10C]] |
|||
Precis: This guide is intended to help you open an '''incoming''' connection |
|||
portmap (port map) or port forwarding on a VMG1312-B10A |
|||
to a service you have running locally, for example: |
|||
* Operating your own mail server |
|||
* Running a gaming server |
|||
* Hosting an FTP server |
|||
* Getting incoming DCC to work for IRC networks, etc. |
|||
This guide is '''NOT''' needed to permit outgoing connections to the internet, |
|||
== This has been tested to work with firmware ver. V1.00(AAJZ.5)C0). == |
|||
e.g.: |
|||
* surfing Facebook, Twitter, Youtube, etc |
|||
* connecting a gaming console to XBox Live |
|||
* connecting to streaming media services |
|||
Method: there are simply two stages needed: |
|||
1. Log in to router |
|||
A: permit an incoming connection to a specific port |
|||
B: set up a Port Forwarding rule to direct the incoming connection to |
|||
the right destination. |
|||
For this example, we are going to open up an incoming connection to port |
|||
| ⚫ | |||
8080 for a web server running on 10.1.1.1 inside our network. |
|||
'''Please be aware that requesting a new configuration from the Control Pages will wipe these settings. We do not have a way to store these indefinitely.''' |
|||
3. Add a new ACL rule. Set a name, destination IP will be the WAN IP, set protocol as required, set destination port to the port you'd like to forward. All the other settings should be OK. Do this again for any other rules you'd like to make. |
|||
== A: Open A Connection (setting up an ACL - "are we allowed in?") == |
|||
| ⚫ | |||
A firewall rule is needed to permit incoming connections to a named |
|||
4. Go to Network Setting > NAT. Set a name. WAN interface dropdown should be set based on the type of service i.e.: AAISP-ADSL for ADSL or AAISP-VDSL for VDSL. WAN IP should be the WAN IP (of course), server address will be the address you'd like to forward to (same as destination IP in the previous menu). Trigger start port, end port, translation start port, and translation end port need to be set to the port you're looking to forward. Protocol should be set as required. |
|||
port. Once logged into your router: |
|||
| ⚫ | |||
| ⚫ | |||
# Click Add New ACL Rule |
|||
# Fill in the required information: |
|||
| ⚫ | |||
The only required fields are: |
|||
* Filter Name: the name to give this rule. Make it meaningful so that it's obvious when looking at a later date |
|||
* Select Destination Device: the final IP address: 10.1.1.1 in our case |
|||
* Custom Destination Port: the port we're opening on the router, 8080 in our case. |
|||
* Policy: ACCEPT (else there's no connection, but flicking it to "DROP" later can temporarily close the port) |
|||
* Direction: WAN to LAN |
|||
Other settings of interest are: |
|||
* Order: there may be a rule of higher priority (lower order number here) that may override this rule. |
|||
* Source IP Address: it's possible to allow specific originating IP ranges (work, known friends, etc). Leaving this blank lets any IP in. |
|||
* Select Service: a set of predefined services and port mappings can be specified on the "Protocol" tab then picked from the drop-down here, rather than manually specifying 8080. |
|||
* Rate Limit: useful for throttling the amount of bandwidth needed, preventing connections from causing stuttering when streaming media or interrupting VoIP usage, for example. |
|||
* Scheduling: useful to specify permitted times (evenings, etc) when free bandwidth is available. |
|||
== B: Setting a Port Forward rule ("where do we go?") == |
|||
This is needed to route the incoming port connection through to. '''This part is only needed if you are doing NAT.''' |
|||
# Navigate to NETWORK SETTING > NAT > Port Forwarding |
|||
# Click Add New Rule |
|||
# Supply the required information: |
|||
| ⚫ | |||
The important fields are: |
|||
* Active: set to Enable |
|||
* Service Name: just a name to reference this by. |
|||
* WAN interface: pick your ADSL/VDSL connection |
|||
* Ports: it is possible to specify a range here. For a single port, keep both values identical, in our case 8080 |
|||
* Translated ports: if we're routing through to the same port number, provide the same values here. Specifying different values (e.g.: incoming:8080 -> internal:80) is used for Port Address Translation. |
|||
* Server IP Address: oddly, needs to be specified again |
|||
* Protocol: safe to leave this at just TCP, but some services also use UDP connections, so set to both initially and change later if required. |
|||
'''''That's it! Test it by initiating connections to this port, for example: |
|||
using "telnet" if necessary.''''' |
|||
Latest revision as of 08:24, 7 October 2020
Precis: This guide is intended to help you open an incoming connection
to a service you have running locally, for example:
- Operating your own mail server
- Running a gaming server
- Hosting an FTP server
- Getting incoming DCC to work for IRC networks, etc.
This guide is NOT needed to permit outgoing connections to the internet, e.g.:
- surfing Facebook, Twitter, Youtube, etc
- connecting a gaming console to XBox Live
- connecting to streaming media services
Method: there are simply two stages needed: A: permit an incoming connection to a specific port B: set up a Port Forwarding rule to direct the incoming connection to the right destination.
For this example, we are going to open up an incoming connection to port 8080 for a web server running on 10.1.1.1 inside our network.
Please be aware that requesting a new configuration from the Control Pages will wipe these settings. We do not have a way to store these indefinitely.
A: Open A Connection (setting up an ACL - "are we allowed in?")
A firewall rule is needed to permit incoming connections to a named port. Once logged into your router:
- Navigate to SECURITY > Firewall > Access Control
- Click Add New ACL Rule
- Fill in the required information:
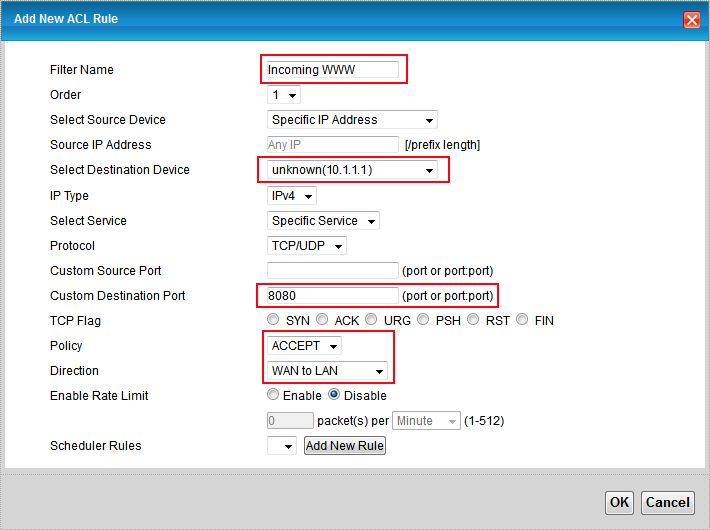
The only required fields are:
- Filter Name: the name to give this rule. Make it meaningful so that it's obvious when looking at a later date
- Select Destination Device: the final IP address: 10.1.1.1 in our case
- Custom Destination Port: the port we're opening on the router, 8080 in our case.
- Policy: ACCEPT (else there's no connection, but flicking it to "DROP" later can temporarily close the port)
- Direction: WAN to LAN
Other settings of interest are:
- Order: there may be a rule of higher priority (lower order number here) that may override this rule.
- Source IP Address: it's possible to allow specific originating IP ranges (work, known friends, etc). Leaving this blank lets any IP in.
- Select Service: a set of predefined services and port mappings can be specified on the "Protocol" tab then picked from the drop-down here, rather than manually specifying 8080.
- Rate Limit: useful for throttling the amount of bandwidth needed, preventing connections from causing stuttering when streaming media or interrupting VoIP usage, for example.
- Scheduling: useful to specify permitted times (evenings, etc) when free bandwidth is available.
B: Setting a Port Forward rule ("where do we go?")
This is needed to route the incoming port connection through to. This part is only needed if you are doing NAT.
- Navigate to NETWORK SETTING > NAT > Port Forwarding
- Click Add New Rule
- Supply the required information:
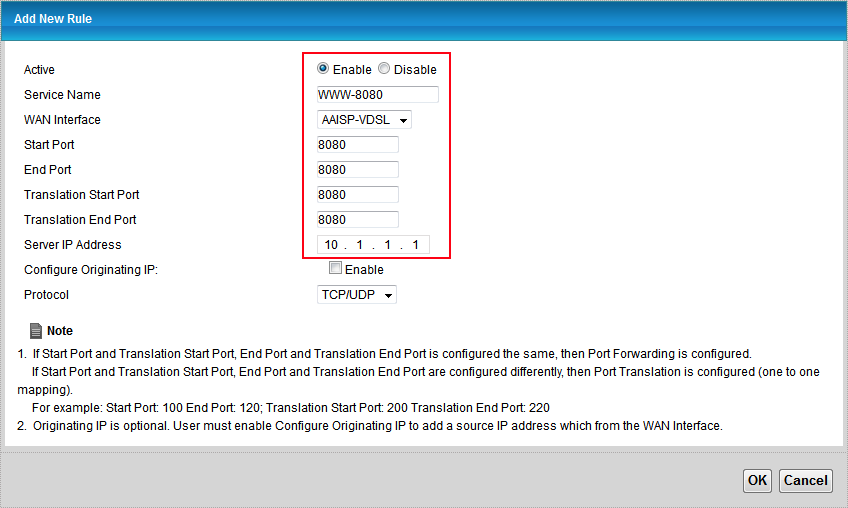
The important fields are:
- Active: set to Enable
- Service Name: just a name to reference this by.
- WAN interface: pick your ADSL/VDSL connection
- Ports: it is possible to specify a range here. For a single port, keep both values identical, in our case 8080
- Translated ports: if we're routing through to the same port number, provide the same values here. Specifying different values (e.g.: incoming:8080 -> internal:80) is used for Port Address Translation.
- Server IP Address: oddly, needs to be specified again
- Protocol: safe to leave this at just TCP, but some services also use UDP connections, so set to both initially and change later if required.
That's it! Test it by initiating connections to this port, for example: using "telnet" if necessary.

