
DGA0122 VoIP: Difference between revisions
mNo edit summary |
No edit summary |
||
| (16 intermediate revisions by 4 users not shown) | |||
| Line 1: | Line 1: | ||
<indicator name="Front">[[File:Menu-B10C.svg|link=:Category:Technicolor_DGA0122|30px|Back up to the Technicolor_DGA0122 Page]]</indicator> |
<indicator name="Front">[[File:Menu-B10C.svg|link=:Category:Technicolor_DGA0122|30px|Back up to the Technicolor_DGA0122 Page]]</indicator> |
||
[[Category:Technicolor_DGA0122]] |
[[Category:Technicolor_DGA0122]] |
||
[[Category:Technicolor_DGA4134]] |
|||
[[File:Rear-Drawing.png|200px|thumb|Green analogue phone ports on the left]] |
|||
== Overview == |
|||
The Technicolor DGA0122 and DGA4134 both have two analogue telephone ports, AKA ATA (Analog Telephone Adaptor). |
|||
These can be used to connected a 'normal' analogue phone and then the router can be configured to make/receive calls over VoIP. |
|||
[[File:BT-RJ11.jpg|200px|thumb|RJ11 to BT adaptors are required ]] |
|||
== Phone Adaptor == |
|||
The ports on the router are RJ11 and usually telephones have a rectangular BT style plug - in which case a RJ11-to-BT adaptor is required. The DGA0122 doesn't come with any adaptors but the DGA4134 comes with one. These are available to buy from A&A. |
|||
The adaptor is effectively providing a BT Master Socket for phone(s) to be plugged into. It should include a bell capacitor for maximum compatibility with UK phones. Many modern phones don't require a bell capacitor, but those which do won't ring without one. |
|||
== Router Configuration == |
|||
These are steps to set up the Technicolor to registrar to an A&A VoIP service and to use the analogue phone ports on the router for calls. |
These are steps to set up the Technicolor to registrar to an A&A VoIP service and to use the analogue phone ports on the router for calls. |
||
| Line 10: | Line 30: | ||
## Set Primary Registrar to: voiceless.aa.net.uk |
## Set Primary Registrar to: voiceless.aa.net.uk |
||
## Set Primary proxy to: voiceless.aa.net.uk (pics below, 'Global Info') |
## Set Primary proxy to: voiceless.aa.net.uk (pics below, 'Global Info') |
||
## Click Save |
|||
# Click the 'Phone Numbers' tab at the top |
# Click the 'Phone Numbers' tab at the top |
||
## For 'sip_profile_0': |
## For 'sip_profile_0': |
||
| Line 21: | Line 42: | ||
The VoIP account should now be registered and calls will work by using any of the two analogue telephone ports on the router. |
The VoIP account should now be registered and calls will work by using any of the two analogue telephone ports on the router. |
||
You can configure further things, such as a second VoIP account and set which account uses which phone port etc. Note that the configuration requires that a second VoIP account uses the same server as the first account. |
|||
The source address will be the single IP address of the PPPoE link. Sadly it doesn't seem able to use the router's PPPoE IPv6 address (in the 2001:8b0:1111:1111:0:ffff::/32 range). |
|||
== Codecs == |
|||
Login to the router as user ''engineer'' with the admin password. Click on the ''Telephony'' tile and then ''show advanced''. |
|||
Change the Voice Audio Codecs to make PCMA the first choice. |
|||
== RTP Ports == |
|||
By default the RTP port range is 40000-65000. You may wish to restrict this (for example, to match firewall settings). This can be done by an ssh connection to |
|||
the router as the ''engineer'' user and admin password, then issuing the commands e.g. |
|||
set InternetGatewayDevice.Services.VoiceService.1.VoiceProfile.1.RTP.LocalPortMin 5000 |
|||
set InternetGatewayDevice.Services.VoiceService.1.VoiceProfile.1.RTP.LocalPortMax 5098 |
|||
<div><ul> |
|||
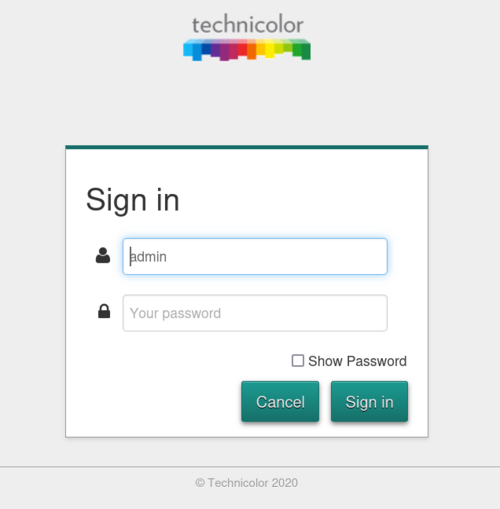
'''1. Log in to the router with the admin credentials from the router card.''' |
|||
<li style="display: inline-block;vertical-align: top;"> [[File:Dga0122login.png|thumb|500px]] </li> |
|||
[[File:Routercard.png|thumb]] |
|||
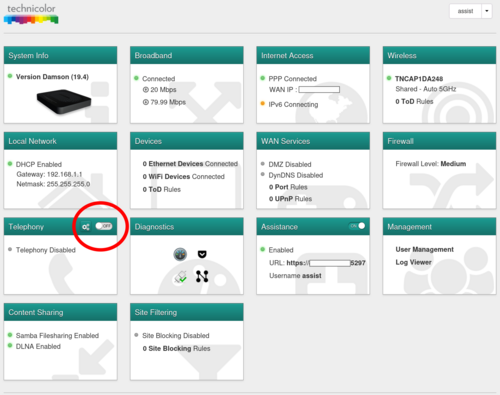
'''2. Click the 'off' switch in the Telephony box to 'On'''' |
|||
<li style="display: inline-block;vertical-align: top;"> [[File:Dga0122tele.png|thumb|500px]] </li> |
|||
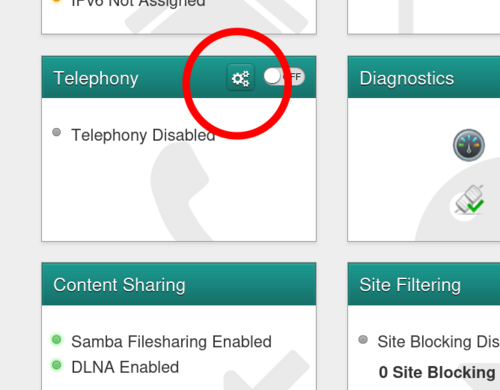
'''3. Click the configure 'cog' in the Telephony box.''' |
|||
<li style="display: inline-block;vertical-align: top;"> [[File:Teleconfigdga.png|thumb|thumb|500px]] </li> |
|||
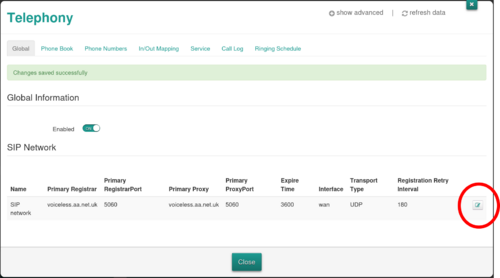
'''4. Set Primary Registrar to 'voiceless.aa.net.uk' & Set Primary proxy to 'voiceless.aa.net.uk'''' |
|||
<li style="display: inline-block;vertical-align: top;"> [[File:Dgasampleconfig.png|thumb|500px]] </li> |
|||
'''5. Click the 'Phone Numbers' tab at the top''' |
|||
<li style="display: inline-block;vertical-align: top;"> [[File:Dgaphonetab.png|thumb|500px]] </li> |
|||
'''5. For 'sip_profile_0':''' |
|||
# Click 'off' to enable it. |
|||
# Set username to your phone number, eg +44123456789 |
|||
# Set password to your SIP password |
|||
# Set DisplayName if you wish |
|||
# Click Save |
|||
# The number should then show as registered |
|||
<li style="display: inline-block;vertical-align: top;"> [[File:Dgaconfigvoipnumber.png|thumb|500px]] </li> |
|||
</ul></div> |
|||
<gallery> |
|||
Technicolor-VoIP-global-info.png|Global Info |
|||
Technicolor-VoIP-registered.png|Registered |
|||
Technicolor-VoIP-registered-front.png|Registered |
|||
</gallery> |
|||
Latest revision as of 11:00, 15 September 2023

Overview
The Technicolor DGA0122 and DGA4134 both have two analogue telephone ports, AKA ATA (Analog Telephone Adaptor).
These can be used to connected a 'normal' analogue phone and then the router can be configured to make/receive calls over VoIP.

Phone Adaptor
The ports on the router are RJ11 and usually telephones have a rectangular BT style plug - in which case a RJ11-to-BT adaptor is required. The DGA0122 doesn't come with any adaptors but the DGA4134 comes with one. These are available to buy from A&A.
The adaptor is effectively providing a BT Master Socket for phone(s) to be plugged into. It should include a bell capacitor for maximum compatibility with UK phones. Many modern phones don't require a bell capacitor, but those which do won't ring without one.
Router Configuration
These are steps to set up the Technicolor to registrar to an A&A VoIP service and to use the analogue phone ports on the router for calls.
- Log in to the router
- Click the 'off' switch in the Telephony box to 'On'
- Click the configure 'cog' in the Telephony box.
- Click the Edit icon on the right had side for the sample configuration
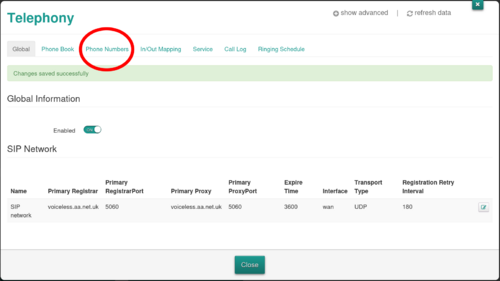
- Set Primary Registrar to: voiceless.aa.net.uk
- Set Primary proxy to: voiceless.aa.net.uk (pics below, 'Global Info')
- Click Save
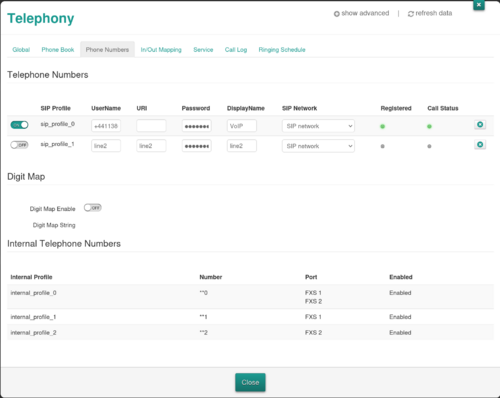
- Click the 'Phone Numbers' tab at the top
- For 'sip_profile_0':
- Click 'off' to enable it.
- Set username to your phone number, eg +44123456789
- Set password to your SIP password
- Set DisplayName if you wish
- Click Save
- The number should then show as registered (pics below)
- For 'sip_profile_0':
The VoIP account should now be registered and calls will work by using any of the two analogue telephone ports on the router.
You can configure further things, such as a second VoIP account and set which account uses which phone port etc. Note that the configuration requires that a second VoIP account uses the same server as the first account.
The source address will be the single IP address of the PPPoE link. Sadly it doesn't seem able to use the router's PPPoE IPv6 address (in the 2001:8b0:1111:1111:0:ffff::/32 range).
Codecs
Login to the router as user engineer with the admin password. Click on the Telephony tile and then show advanced. Change the Voice Audio Codecs to make PCMA the first choice.
RTP Ports
By default the RTP port range is 40000-65000. You may wish to restrict this (for example, to match firewall settings). This can be done by an ssh connection to the router as the engineer user and admin password, then issuing the commands e.g.
set InternetGatewayDevice.Services.VoiceService.1.VoiceProfile.1.RTP.LocalPortMin 5000
set InternetGatewayDevice.Services.VoiceService.1.VoiceProfile.1.RTP.LocalPortMax 5098
-
-
-
thumb -
-
- Click 'off' to enable it.
- Set username to your phone number, eg +44123456789
- Set password to your SIP password
- Set DisplayName if you wish
- Click Save
- The number should then show as registered
-
1. Log in to the router with the admin credentials from the router card.


2. Click the 'off' switch in the Telephony box to 'On'

3. Click the configure 'cog' in the Telephony box.

4. Set Primary Registrar to 'voiceless.aa.net.uk' & Set Primary proxy to 'voiceless.aa.net.uk'

5. Click the 'Phone Numbers' tab at the top

5. For 'sip_profile_0':
