
VoIP Phones - Yealink DECT: Difference between revisions
mNo edit summary |
|||
| (10 intermediate revisions by 2 users not shown) | |||
| Line 1: | Line 1: | ||
<indicator name="VoIPConfiguring">[[File:menu-voip.svg|link=:Category:VoIP Phones|30px|Back up to the VoIP Configuring page]]</indicator> |
<indicator name="VoIPConfiguring">[[File:menu-voip.svg|link=:Category:VoIP Phones|30px|Back up to the VoIP Configuring page]]</indicator> |
||
__NOTOC__ |
|||
[[Image:W53P-1.png|thumb|Yealink W60B base and handset]] |
[[Image:W53P-1.png|thumb|Yealink W60B base and handset]] |
||
= Configuring Yealink DECT phone for AAISP = |
= Configuring Yealink DECT phone for AAISP = |
||
| Line 14: | Line 14: | ||
*PoE or Mains plug for power |
*PoE or Mains plug for power |
||
*Transfer button (allows assisted or blind transfers to other SIP extensions/external numbers) |
*Transfer button (allows assisted or blind transfers to other SIP extensions/external numbers) |
||
*Docs/firmware from Yealink: https://support.yealink.com/en/portal/docList?archiveType=document&productCode=b0040cca269c2a01 |
|||
*[https://www.yealink.com/upfiles/products/datasheet/Yealink-W60B-Datasheet.pdf Datasheet] |
*[https://www.yealink.com/upfiles/products/datasheet/Yealink-W60B-Datasheet.pdf Datasheet] |
||
| Line 80: | Line 81: | ||
# Select 'Account' & 'Register' tab & enter you VoIP number (+44...) in 'Register Name' & 'Username'. |
# Select 'Account' & 'Register' tab & enter you VoIP number (+44...) in 'Register Name' & 'Username'. |
||
# Enter SIP from your control page into 'Password' box. |
# Enter SIP password from your control page into 'Password' box. |
||
# Set 'Server Host' to 'voiceless.aa.net.uk'. |
# Set 'Server Host' to 'voiceless.aa.net.uk'. |
||
# Click 'Confirm'. |
# Click 'Confirm'. |
||
| Line 137: | Line 138: | ||
You have the flexibility to decide which VoIP account should ring which handset, and also which account the handsets use to make their outgoing calls. |
You have the flexibility to decide which VoIP account should ring which handset, and also which account the handsets use to make their outgoing calls. |
||
<gallery mode="packed" widths=250px heights=250px mode="nolines" caption="Screenshots"> |
<gallery mode="packed" widths=250px heights=250px mode="nolines" caption="Screenshots of number assignment page"> |
||
Yealink W53P |
Yealink W53P Handset Assignment.png|Number Assignment |
||
Yealink-4handsets1number.png|Four Handsets sharing one VoIP Account |
Yealink-4handsets1number.png|Four Handsets sharing one VoIP Account |
||
</gallery> |
</gallery> |
||
| Line 189: | Line 190: | ||
OK --> Call Features (orange) --> Do Not Disturb |
OK --> Call Features (orange) --> Do Not Disturb |
||
| ⚫ | |||
| ⚫ | |||
| ⚫ | |||
| ⚫ | |||
| ⚫ | |||
| ⚫ | |||
| ⚫ | |||
| ⚫ | |||
| ⚫ | |||
| ⚫ | |||
| ⚫ | |||
If you have lost the password you will have to factory reset the base station, and the default username and password will then work, and you'll need to configure the unit again. |
|||
There are a few ways to factory reset the Yealink base station: |
There are a few ways to factory reset the Yealink base station: |
||
===From web ui=== |
===From web ui=== |
||
If you know the password! |
|||
Settings -> Upgrade --> Reset |
Settings -> Upgrade --> Reset |
||
| Line 207: | Line 224: | ||
# Wait a further 5 minutes |
# Wait a further 5 minutes |
||
# Then, reboot the base station by unplugging it from power and plugging it back in |
# Then, reboot the base station by unplugging it from power and plugging it back in |
||
| ⚫ | |||
| ⚫ | |||
| ⚫ | |||
| ⚫ | |||
| ⚫ | |||
| ⚫ | |||
| ⚫ | |||
| ⚫ | |||
| ⚫ | |||
| Line 224: | Line 231: | ||
[[Category:VoIP Phones| |
[[Category:VoIP Phones|Yealink DECT]] |
||
Latest revision as of 17:57, 17 March 2025

Configuring Yealink DECT phone for AAISP
Relevant to: Yealink W60B, W70B, W73P, W53P and other base stations
The Yealink W60B/W70B is a DECT base station aimed at home as well as small and medium-sized businesses. Its main specifications are:
- Up to 8 handsets
- Up to 8 SIP accounts
- Up to 8 simultaneous calls
- Support for additional 'DECT repeaters'
- IPv4 and IPv6
- PoE or Mains plug for power
- Transfer button (allows assisted or blind transfers to other SIP extensions/external numbers)
- Docs/firmware from Yealink: https://support.yealink.com/en/portal/docList?archiveType=document&productCode=b0040cca269c2a01
Credentials
| As shipped / unconfigured | Once configured | |
|---|---|---|
| IP: | DHCP | DHCP |
| Username: | admin | |
| Password: | admin | contact us |
| PIN: | 0000 | contact us |
The PIN is used to register handsets to the base station, and for the handset to access settings from the base station. When a Base and a handset are supplied together in a single box, then the handset should already be registered to the base station. You can use these steps to register additional handsets though:
Registering an additional Handset
- Power up handset
- Press the button under 'Reg'
- Hold the 'Radio' button on the Base for 3 seconds
- Handset should then initialise
- Go to the Base station UI and set up the new account:
- Account - Number Assignment - or set up a new account:
- Account - Set Account2 --> Fill in details
- Account - Handset name --> Set the name
-
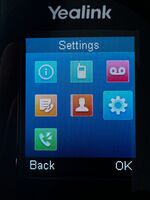 Scroll to Settings & press Ok.
 -
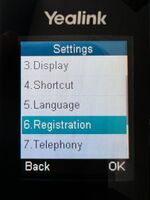 Arrow down to 6.Registration the press Ok.
 -
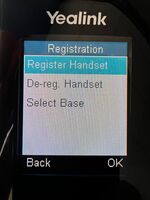 Press Register Handset.
 -
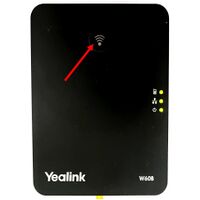 Radio Button on Base Unit


Find the IP address of the Base station & login to setup web pages.
By default the Yealink base unit picks up an IP address using DHCP. You can find the IP address from the Handset as follows:
- Press 'Ok' on the handset and 'Ok' on 'Status'
- Select 'Base' and press 'Ok'
- Under IPv4 you will see the IP address e.g. 192.168.1.3 (different for each user).
- Enter that IP in the address bar of your Web browser.
- Login with admin credentials. (default is user:admin password:admin).
-
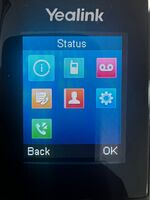 3.1 Press Ok on the handset and Ok on Status
 -
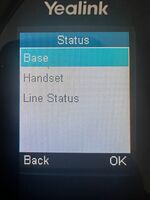 3.2 Select Base and press Ok
 -
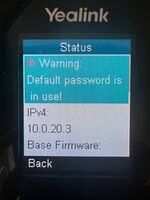 3.3 Under IPv4 you will see the IP address.


Yealink and Voiceless Settings
On the web interface, go to:
- Select 'Account' & 'Register' tab & enter you VoIP number (+44...) in 'Register Name' & 'Username'.
- Enter SIP password from your control page into 'Password' box.
- Set 'Server Host' to 'voiceless.aa.net.uk'.
- Click 'Confirm'.
- If correct then you should see Register Status = 'Registered'.
- If you have more than one number you can select 'Account1' drop down and add further numbers.
| Yealink Settings | |
|---|---|
| Setting | Value |
| Line Active | Enabled |
| Label | AAISP (or what ever you like) |
| Display Name | Your Name (or what ever you like) |
| Register Name | Your phone number, +44... |
| Username | Your phone number, +44... |
| Password | Your SIP password |
| Server Host | voiceless.aa.net.uk |
| Server Expires | 600 |
Repeat this for any other accounts you want to add.
Check the SIP registration status:
Go to:
Status -> Handset & VoIP
You should the the account Status as 'Registered'
- Screenshot of Account registration page
-
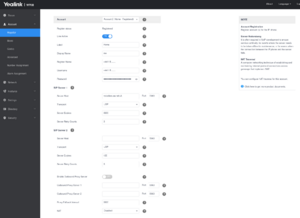 VoIP Account settings

Handset Assignment
Here you can assign which of your (up to) 8 SIP accounts are to ring which of your (up to) 8 handsets! You can also make up to 8 calls at once, so a single base station can support a small office of people.
- From the 'Account' tab select 'Number assignment' from menu.
- Here you can select which handsets are connected to your numbers for outgoing and incoming calls.
You have the flexibility to decide which VoIP account should ring which handset, and also which account the handsets use to make their outgoing calls.
- Screenshots of number assignment page
-
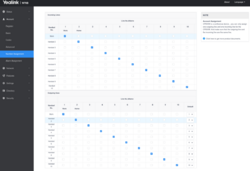 Number Assignment
 -
 Four Handsets sharing one VoIP Account


Other optional settings
These are optional, but recommended settings to have:
Features -> General Information -> Accept SIP Trust Server Only --> Set to Enabled (This stops direct 'ghost calls' from the internet, and only allows calls from the registered SIP server)
-
 To disable Ghost calls
Features -> General Information -> Call Waiting --> set to Disabled
Features -> General Information -> Number Of Active Handsets --> Set to 8 (if you have more than 4 handsets)
Features -> General Information -> Fwd International --> set to Disable (no need to allow forwarding to international numbers)
Features -> Phone Lock --> Add 999 to the list of emergency numbers
Settings -> Time&Date -> Time Zone --> 0 GMT
Settings -> Time&Date -> Primary Server --> time.aa.net.uk
Settings -> Time&Date -> Date Format --> YYYY-MM-DD
Settings -> Tones --> Set to Great Britain
Account -> Handset Name --> Give a name to each handset, will be displayed on their screen
Transfer a call
The handsets, eg the W53H, have a dedicated 'Transfer' button 'TRAN'. This lets you transfer a call to someone else.
Assisted Transfer on a Yealink W53H handset
Say you have an incoming call that you've answered, and you want to transfer it to someone else and introdice the caller as you go...
- Answer the incoming call, and find out who they want to be transferred to
- Press the TRAN button
- At this point the caller is put on hold
- Enter in the extension number or full number of who you want to transfer the call to
- Press the Green dial button
- At this point you will be ringing the third party
- If no answer, then you can press the button under End to go back to the original caller
- At this point you can also Blind transfer the call, by pressing the button under Transfer
- Once answered, you can introduce the original caller and press the button under Transfer
DND - Do not disturb
You can enable/disable DND via the handset for each of the SIP accounts allocated to the Yealink handset:
OK --> Call Features (orange) --> Do Not Disturb
Registering an additional Handset
- Power up handset
- Press the button under 'Reg'
- Hold the button on the Base for 3 seconds
- Handset should then initialise
- Go to the Base station UI and set up the new account:
- Account - Number Assignment - or set up a new account:
- Account - Set Account2 --> Fill in details
- Account - Handset name --> Set the name
Factory reset the Yealink DECT Base Station
If you have lost the password you will have to factory reset the base station, and the default username and password will then work, and you'll need to configure the unit again.
There are a few ways to factory reset the Yealink base station:
From web ui
If you know the password!
Settings -> Upgrade --> Reset
From a connected handset
OK -> Settings -> System Settings -> Base Reset
You'll need to know the PIN (default is 0000)
From the actual base station
- Unplug the power
- Press and hold the Connect button
- Whilst holding, plug in the power
- Wait until all three lights on the base station are showing as solid green
- Release the connect button
- Wait a further 5 minutes
- Then, reboot the base station by unplugging it from power and plugging it back in
Firewall & Security
- You will also want to set up firewall rules, as per the VoIP Firewall page.
- Also see the VoIP Security page for information about securing your VoIP service.