Changing Windows MTU: Difference between revisions
Appearance
Content deleted Content added
mNo edit summary |
|||
| Line 39: | Line 39: | ||
# restarting the computer should change the MTU back to default |
# restarting the computer should change the MTU back to default |
||
# Or, you can run the commands above, but set <SyntaxHighlight inline>1500</SyntaxHighlight> instead of <SyntaxHighlight inline>1320</SyntaxHighlight> |
# Or, you can run the commands above, but set <SyntaxHighlight inline>1500</SyntaxHighlight> instead of <SyntaxHighlight inline>1320</SyntaxHighlight> |
||
<gallery widths=600> |
|||
Windows-mtu-2.png|Change the MTU for the interface |
|||
</gallery> |
|||
Revision as of 09:31, 16 June 2023
Sometimes you may have a reason to change the MTU on your windows computer. Here is how.
1. Open Command Prompt as Administrator
- Click start
- Type cmd
- On the Right hand side, click 'Run as administrator'
<gallerywidths=600 heights=300> Windows-mtu-1.png|Open command prompt, as Administrator </gallery>
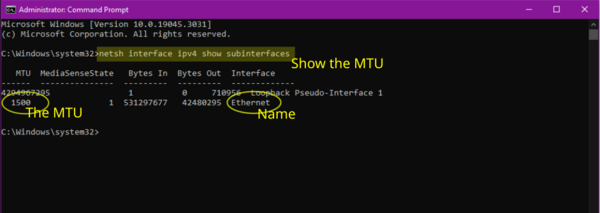
2. Show the current MTU and the interface name
- Enter in the command:
netsh interface ipv4 show subinterfaces - Make a note of the existing MTU (probably 1500)
- Make a note of the interface name - eg Ethernet
-
Show the current MTU and interface name
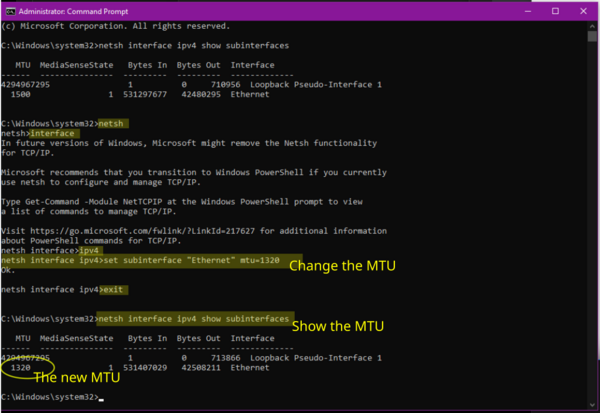
3. Change the MTU for the interface
- Enter the command:
netsh - Then:
interface
Then: ipv4
Then: set subinterface "Ethernet" mtu=1320
Then: exit
-
Changing the MTU to 1320
5. Check the MTU
- Run the first command to show the Interface details again:
netsh interface ipv4 show subinterfaces - It should now show
1320
6. Reverting back
- restarting the computer should change the MTU back to default
- Or, you can run the commands above, but set
1500instead of1320

