
FireBrick Road Warrior OSX: Difference between revisions
m clean up, typos fixed: Therefore → Therefore,, etc → etc. , eg → e.g. (7), the the → the |
|||
| Line 1: | Line 1: | ||
<indicator name="RoadW">[[File:Menu-Road-Warrior.svg|link=:Category: |
<indicator name="RoadW">[[File:Menu-Road-Warrior.svg|link=:Category:FireBrick IPsec Road Warrior|30px|Back up to the FireBrick Road Warrior Category Page]]</indicator> |
||
| Line 6: | Line 6: | ||
== Getting the CA from the FireBrick == |
== Getting the CA from the FireBrick == |
||
Note: this guide doesn't go into actual configuration of the FireBrick to be an endpoint, merely how to connect your Mac client to it. Therefore it is assumed the certificate already exists on the FireBrick. It may also be that this is emailed to you by whoever maintains your FireBrick, in which case skip this step. |
Note: this guide doesn't go into actual configuration of the FireBrick to be an endpoint, merely how to connect your Mac client to it. Therefore, it is assumed the certificate already exists on the FireBrick. It may also be that this is emailed to you by whoever maintains your FireBrick, in which case skip this step. |
||
#Log into the Firebrick. |
#Log into the Firebrick. |
||
| Line 12: | Line 12: | ||
#Click on the Certificates menu beneath that. |
#Click on the Certificates menu beneath that. |
||
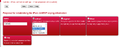
#You should be presented with a list of certificates installed. Each line will look approximately as follows : [[File:Toothless_-_Cliff_s_test_FB2700_2700-0001-9224_Certificate_management.jpg]] |
#You should be presented with a list of certificates installed. Each line will look approximately as follows : [[File:Toothless_-_Cliff_s_test_FB2700_2700-0001-9224_Certificate_management.jpg]] |
||
#At the right hand end of the row corresponding |
#At the right hand end of the row corresponding the certificate you wish to download, click on the PEM link. |
||
== Installing the CA certificate into OSX == |
== Installing the CA certificate into OSX == |
||
| Line 19: | Line 19: | ||
#In the bottom/left are named 'Category', click on Certificates |
#In the bottom/left are named 'Category', click on Certificates |
||
#Go to: File - Import Items |
#Go to: File - Import Items |
||
#Select the file you've downloaded, |
#Select the file you've downloaded, e.g. ca-cert.pem |
||
#Review the certificate and then select Always Trust, you may be asked to confirm your apple user password. |
#Review the certificate and then select Always Trust, you may be asked to confirm your apple user password. |
||
| Line 30: | Line 30: | ||
If you have El Capitan or Sierra then the built in VPN connection settings should just work. You will still need to install the Certificate as above, but you can skip the StrongSwan parts below and just use the Network Settings to add a VPN IKEv2 connection. |
If you have El Capitan or Sierra then the built in VPN connection settings should just work. You will still need to install the Certificate as above, but you can skip the StrongSwan parts below and just use the Network Settings to add a VPN IKEv2 connection. |
||
==Create the VPN Connection |
==Create the VPN Connection== |
||
#Go to Apple Menu - System Preferences |
#Go to Apple Menu - System Preferences |
||
#Go to Network |
#Go to Network |
||
| Line 36: | Line 36: | ||
#*Interface: VPN |
#*Interface: VPN |
||
#*VPN Type: IKEv2 |
#*VPN Type: IKEv2 |
||
#*Service Name: |
#*Service Name: e.g. 'FireBrick' or 'Office' |
||
#On the next window fill in the information: |
#On the next window fill in the information: |
||
#*Server Address: Hostname or IP of your FireBrick. |
#*Server Address: Hostname or IP of your FireBrick. e.g.: server.example.com |
||
#*Remote ID: The 'FQDN' of the Firebrick as created when you created the Certificate (Usually the full hostname of the FireBrick). |
#*Remote ID: The 'FQDN' of the Firebrick as created when you created the Certificate (Usually the full hostname of the FireBrick). e.g.: server.example.com |
||
#*Local ID - leave empty |
#*Local ID - leave empty |
||
#In the Authentication Settings: |
#In the Authentication Settings: |
||
#*Username: your EAP Username as set on the FireBrick, |
#*Username: your EAP Username as set on the FireBrick, e.g. fred |
||
#*Password: your EAP Password as set on the FireBrick |
#*Password: your EAP Password as set on the FireBrick |
||
#May as well tick 'Show VPN status in menu bar' as you'll then be able to connect etc from the menu in your top bar |
#May as well tick 'Show VPN status in menu bar' as you'll then be able to connect etc. from the menu in your top bar |
||
=OSX version 10.10,'Yosemite' and earlier= |
=OSX version 10.10,'Yosemite' and earlier= |
||
| Line 65: | Line 65: | ||
#Click Add Connection (Screenshot below) |
#Click Add Connection (Screenshot below) |
||
##Name: |
##Name: e.g. FireBrick (Screenshot below) |
||
##Authentication IKEv2 EAP |
##Authentication IKEv2 EAP |
||
##Server address: IP or Name of your FireBrick, |
##Server address: IP or Name of your FireBrick, e.g. server.example.com |
||
##Click OK |
##Click OK |
||
| Line 101: | Line 101: | ||
[[Category: |
[[Category:FireBrick IPsec Road Warrior|OS X]] |
||
Revision as of 23:59, 14 March 2017
It is possible to connect an Apple Mac with OSX to a FireBrick over IPSEC with IKEv2 and EAP. Regrettably the IPSEC facilities within OSX before version 'El Capitan' are not fully enough featured to achieve this alone, so some additional VPN client software can be installed called StrongSwan. Details below describe how to install the CA certificate from the FireBrick to your Apple computer and then how to set up the VPN connection either by using El Capitan's built in VPN settings or by using StronSwan.
Getting the CA from the FireBrick
Note: this guide doesn't go into actual configuration of the FireBrick to be an endpoint, merely how to connect your Mac client to it. Therefore, it is assumed the certificate already exists on the FireBrick. It may also be that this is emailed to you by whoever maintains your FireBrick, in which case skip this step.
- Log into the Firebrick.
- Click on the Config menu in the bar on the left.
- Click on the Certificates menu beneath that.
- You should be presented with a list of certificates installed. Each line will look approximately as follows :

- At the right hand end of the row corresponding the certificate you wish to download, click on the PEM link.
Installing the CA certificate into OSX
- Go to: Applications - Utilities - Keychain Access
- In the top/left area named 'Keychains, click on System
- In the bottom/left are named 'Category', click on Certificates
- Go to: File - Import Items
- Select the file you've downloaded, e.g. ca-cert.pem
- Review the certificate and then select Always Trust, you may be asked to confirm your apple user password.
-
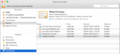 The Keychains Application
 -
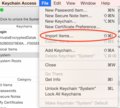 Import Items Menu


OSX versions 10.11 El Capitan, 10.12 Sierra and above
If you have El Capitan or Sierra then the built in VPN connection settings should just work. You will still need to install the Certificate as above, but you can skip the StrongSwan parts below and just use the Network Settings to add a VPN IKEv2 connection.
Create the VPN Connection
- Go to Apple Menu - System Preferences
- Go to Network
- Click the + Icon on the bottom/left, and choose:
- Interface: VPN
- VPN Type: IKEv2
- Service Name: e.g. 'FireBrick' or 'Office'
- On the next window fill in the information:
- Server Address: Hostname or IP of your FireBrick. e.g.: server.example.com
- Remote ID: The 'FQDN' of the Firebrick as created when you created the Certificate (Usually the full hostname of the FireBrick). e.g.: server.example.com
- Local ID - leave empty
- In the Authentication Settings:
- Username: your EAP Username as set on the FireBrick, e.g. fred
- Password: your EAP Password as set on the FireBrick
- May as well tick 'Show VPN status in menu bar' as you'll then be able to connect etc. from the menu in your top bar
OSX version 10.10,'Yosemite' and earlier
For versions 10.10 and earlier you'll need to use the StronSwan program. You will still need to install the CA certificate as above.
Downloading & installing the StrongSwan Native Client
Visit the download site and download the latest binary. At the time of writing the latest version was strongswan-5.3.2-1.app.zip. Allow the machine to unarchive it; usually by selecting the "Open with Archive Utility" option. This will deposit the StrongSwan.app into your downloads directory. Drag the app from the downloads directory into your Applications folder. This completes installation of the StrongSwan Client.
-
 strongSwan OSX

Configure strongSwan
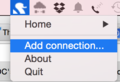
Run strong swan by either:
- Go to Applications and click on the strongSwan icon
- Use the 'spotlight' search tool neat the clock to search for strongSwan
You'll then have a swan icon in your clock tool bar at the top (it actually looks like a Dalek!) (Screenshot below)
- Click Add Connection (Screenshot below)
- Name: e.g. FireBrick (Screenshot below)
- Authentication IKEv2 EAP
- Server address: IP or Name of your FireBrick, e.g. server.example.com
- Click OK
-
 strongSwan menu icon
 -
 Add a Strongswan connection
 -
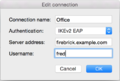 Strongswan settings


Connect!
- Click on the
DalekStrongSwan icon once more, - Click your connection name then connect.
- The first time, you may be asked to install a 'Helper' application for Strong Swan, your computer password will be required
- You'll be prompted for the password, this is the one as set up in the EAP Identity on the FireBrick (in this example, we had set up a user of fred with a password)
Error: Unsupported integrity algorithm
There is one "gotcha" with StrongSwan on MAC though - it may negotiate an encryption algorithm for the data connection which OS X doesn't support, the FireBrick will create a log like:
failed to create ESP context: unsupported integrity algorithm AES_XCBC_96
This really a bug in the way the StrongSwan app was built - it shouldn't negotiate AES if the underlying OS can't do it (which as of July 2015 OSX can't manage AES). However, the easy workaround is to set up an ipsec-proposal to avoid this:
- On the FB config editor create a 'Proposals for IPsec AH/ESP security association'.
- Give is a name, and set, for example, HMAC-SHA1 for authset.
- Then, back in the 'IPsec IKE connection settings' select the new Proposal in the 'ipsec-proposals' drop down.
Here is example config for this:
<IPsec-proposal name="custom" authset="HMAC-SHA1"/>
-
 Using a Custom Authset in the UI