ZyXEL GS1900-8: Difference between revisions
m clean up, typos fixed: eg, → e.g., |
|||
| Line 32: | Line 32: | ||
==Accessing the switch== |
==Accessing the switch== |
||
*Set your computer to be on an IP in the subnet that the switch is in, |
*Set your computer to be on an IP in the subnet that the switch is in, e.g., 192.168.1.100/255.255.255.0 |
||
*In your browser, go to http://192.168.1.1 |
*In your browser, go to http://192.168.1.1 |
||
*Login with the default credentials as above |
*Login with the default credentials as above |
||
| Line 118: | Line 118: | ||
==Further, Optional settings== |
==Further, Optional settings== |
||
===Name the switch |
===Name the switch=== |
||
*From the front page, click the settings/Cog icon on the left |
*From the front page, click the settings/Cog icon on the left |
||
**Click System, then Information |
**Click System, then Information |
||
| Line 125: | Line 125: | ||
*Click Save from the top/right corner of the web interface |
*Click Save from the top/right corner of the web interface |
||
===Set Names for your VLANs |
===Set Names for your VLANs=== |
||
*From the front page, click the settings/Cog icon on the left |
*From the front page, click the settings/Cog icon on the left |
||
*Click VLAN, then VLAN |
*Click VLAN, then VLAN |
||
Revision as of 00:08, 15 March 2017
Overview
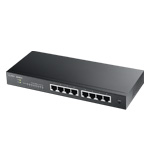
The GS1900-8 is a fanless 8 port gigabit managed switch. It has a web interface to set it up, and is ideal as a small VLAN capable switch.
There is also an Power over Ethernet version available, the GS1900-8HP, which has a larger PSU and supports PoE.
Configuration
Factory Default Admin Username/Password
Note: If AAISP configured the switch then the credentials will be different
| Default/Factory Password | ||
|---|---|---|
| IP: | 192.168.1.1 | |
| Username: | admin | |
| Password: | 1234 | |
https is enabled by default, albeit with a certificate that will give browser warnings
When you make a change to the configuration you must click Save from the top/right corner of the web interface
Factory Reset
Hold in the reset button on the front for 10 seconds, release, and all the port lights will light up and the switch will reboot.
Accessing the switch
- Set your computer to be on an IP in the subnet that the switch is in, e.g., 192.168.1.100/255.255.255.0
- In your browser, go to http://192.168.1.1
- Login with the default credentials as above
VLAN Configuration for Bonding Multiple lines with a FireBrick
When using with a FireBrick for bonding multiple lines we can use VLANS for each of the PPP sessions.
We have created a config file and have also outlined the construction in configuring the switch for the VLANS.
VLAN config
We'll configure the switch as:
- Port 1 - VLAN 101, for ADSL line 1
- Port 2 - VLAN 102, for ADSL line 2
- Port 3 - VLAN 103, for ADSL line 3
- Port 4 - VLAN 104, for ADSL line 4
- Port 8 is for the FireBrick
The Modems are not VLAN aware, or even if they are we don't need them to be. We'll set ports 1-4 to TAG incoming packets with the correct VLAN, and to send packets to the modems as untagged.
Ports 5, 6 and 7 will be unused, these could be used to access the switch config if you wanted.
Pre-prepared config file for FireBrick bonding
We have created a config file for the above config, it has the default admin password so that should be changed. To apply the config:
- Download the config: File:ZyXELGS1900-8-FireBrickVLANs.cfg.zip
- Unzip the 'ZyXELGS1900-8-FireBrickVLANs.cfg' file and save it to your computer.
- Plug computer in to port 7
- Set computer to IP: 192.168.1.2 mask: 255.255.255.0
- Log in to the switch via http://192.168.1.1 with admin and 1234
- From the front page, click the Maintenance icon on the left
- Click Configuration, then Restore
- Select HTTP, and then Choose the file then click Apply (the file will be ZyXELGS1900-8-FireBrickVLANs.cfg)
- Wait a moment for the switch to load and reboot - about 20 seconds
- Plug the modems on to ports 1-4 and the FireBrick to port 8.
- Log back in to the switch and set the admin password!
Manually Creating the VLANs

- From the front page, Click VLAN
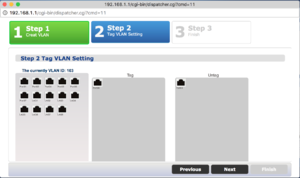
- Create a new VLAN, enter in 101, then Click Next
- Drag Port01 to the Untagged area
- Drag Port08 to the tagged area
- Click Next, then click Finish
- Create a new VLAN, enter in 101, then Click Next
- Click Save from the top/right corner of the web interface
This process repeats for VLAN 102, 103, 104 but you use Port02 for VLAN 102, Port03 for VLAN 103, Port04 for VLAN 104... so:
- From the front page, Click VLAN
- Create a new VLAN, enter in 102, then Click Next
- Drag Port02 to the Untagged area
- Drag Port08 to the tagged area
- Click Next, then click Finish
- Create a new VLAN, enter in 102, then Click Next
- Click Save from the top/right corner of the web interface
- From the front page, Click VLAN
- Create a new VLAN, enter in 103, then Click Next
- Drag Port03 to the Untagged area
- Drag Port08 to the tagged area
- Click Next, then click Finish
- Create a new VLAN, enter in 103, then Click Next
- Click Save from the top/right corner of the web interface
- From the front page, Click VLAN
- Create a new VLAN, enter in 104, then Click Next
- Drag Port04 to the Untagged area
- Drag Port08 to the tagged area
- Click Next, then click Finish
- Create a new VLAN, enter in 104, then Click Next
- Click Save from the top/right corner of the web interface
- Set the PVID for ports 1-4. this makes the switch tag the packets from the Modems with the corresponding VLAN ID.
- From the front page left menu, Click VLAN then VLAN
- Click the Port Tab
- Tick Port 1, then click Edit
- Set PVID to 101.
- Repeat the above Port settings for ports 2, 3 and 4 using PVID 102, 103 and 104.
Change admin password
- From the front page, click the settings/Cog icon on the left
- Click Management, then Users
- Click the Modify icon next to the admin user
- Enter in your new password and click Apply.
- Click Save from the top/right corner of the web interface
Further, Optional settings
Name the switch
- From the front page, click the settings/Cog icon on the left
- Click System, then Information
- Enter in Name, Location, Contact details as you wish
- Click Apply
- Click Save from the top/right corner of the web interface
Set Names for your VLANs
- From the front page, click the settings/Cog icon on the left
- Click VLAN, then VLAN
- Click the modify icon to the right of VLAN 101
- Change the name from VLAN0101 to, say, PPP101
- Click Apply
- Repeat for the other VLANs
- Click Save from the top/right corner of the web interface
Name the Ethernet ports
- From the front page, click the settings/Cog icon on the left
- Click Port, then Port
- Tick the bot next to Port 1, Click Edit
- Set the name to, say, Modem1
- Repeat the above for ports 2, 3, and 4. For port 8, name that FireBrick.
- Click Save from the top/right corner of the web interface
