FTTC Checks: Difference between revisions
clean up, typos fixed: a underlying → an underlying (2) |
No edit summary |
||
| (2 intermediate revisions by the same user not shown) | |||
| Line 58: | Line 58: | ||
== Step 3: Eliminate Internal Wiring == |
== Step 3: Eliminate Internal Wiring == |
||
| ⚫ | You will know if your socket has a removable faceplate if it has a BT or Openreach logo, and a separate removable faceplate covering the bottom half (see examples for sockets with a removable face plates below). You can then remove the faceplate to isolate the internal wiring in the building as per the steps below: |
||
[[File:Nte5open.png|right|100px]] |
|||
| ⚫ | |||
| ⚫ | |||
| ⚫ | |||
#Behind the faceplate is another telephone socket. Connect your broadband splitter to that and the router to the splitter. |
#Behind the faceplate is another telephone socket. Connect your broadband splitter to that and the router to the splitter. |
||
# |
#Leave connected here for an appropriate period of time to see if they problem goes away, e.g. 24 hours. |
||
#If it does, the problem is in your internal wiring and |
#If it does, the problem is in your internal wiring and it will be your responsibility to get that fixed. |
||
If you do not have a master socket like this (meaning your phone installation dates to before ~1986), try connecting the broadband splitter to the first socket where the line comes in to the building, and connect the router to the splitter. |
If you do not have a master socket like this (meaning your phone installation dates to before ~1986), try connecting the broadband splitter to the first socket where the line comes in to the building, and connect the router to the splitter. |
||
[[File:Master-sockets Examples.jpg|right|500px]] |
|||
[[File:TestSocketExample.png|left|500px]] |
|||
|- |
|- |
||
Latest revision as of 15:59, 18 May 2021
There are a number of checks that are sensible to try and carry out before even contacting support. Some of these will depend on whether you have a master socket, etc. However, in most cases if you call support we'll ask you to do most of these checks anyway.
Our control pages show graphs of the loss and latency on your line and will help you confirm there is a real problem rather than a local networking issue. It is also possible to run some BT line tests from the control pages as well if you wish. These can be seen by support staff later and can help diagnose the problem.
 |
Step 1: Check EquipmentWe know it is obvious but please do check power is on to the Openreach modem (if you have one), and your router, that the modem is connected to the phone line, and that it actually has lights on. It is usually worth trying a simple power cycle (turn off, wait 30 seconds, turn on) to see if that clears a problem. This is not something that should be needed routinely, but always worth a try as the first step if you have a fault. Most FTTC services installed before summer 2015 are supplied with an Openreach modem, if the modem looks faulty - e.g.: No power, DSL light is off, then contact AAISP as this usually means there is a fault. You can also try connecting to the Internet with just a PC plugged in to the Openreach modem. This will eliminate the router that you are using and will help pinpoint the problem. You can create a new PPPoE connection using the settings:
If you login all ok, then the fault may be with the router that you are using. See: help in setting up a PPPoE connection on a computer.
|
 |
Step 2a: Check Phone Line (Andrews & Arnold line)Do the following only if you pay us for your telephone line rental.
If you find a problem with the phone line in any way then you need to report to us. The phone line has to be fixed and working before any broadband fault can be addressed. Fixing an underlying phone line issue usually resolves any broadband issues you may be experiencing. It is possible that a phone line fault could be caused by some work on the line regarding the broadband service, such as a migration, could have caused a fault in the phone line. e.g., an Openreach engineer in the exchange may have made a mistake which caused the phone line itself to break. If your line has recently been migrated to us, we may need to check that no damage was inflicted to your line in the process. |
 |
Step 2b: Check Phone Line (3rd Party Line)Do the following if you pay someone else telephone line rental.
If you find a problem with the phone line in any way then you need to report to your telephone service provider. The phone line has to be fixed and working before any broadband fault can be addressed. Fixing an underlying phone line issue usually resolves any broadband issues you may be experiencing. It is possible that a phone line fault could be caused by some work on the line regarding the broadband service, such as a migration, could have caused a fault in the phone line. e.g., an Openreach engineer in the exchange may have made a mistake which caused the phone line itself to break. Unfortunately, even in these cases, if the phone line is faulty then the phone line provider will still need to be contacted and a fault reported to them. If the phone line provider is BT, then a fault can be reported online or by calling them. |
 |
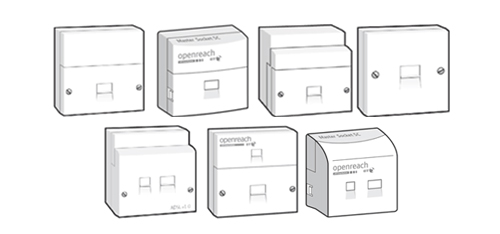
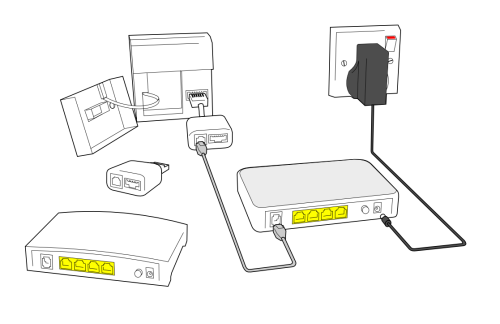
Step 3: Eliminate Internal WiringYou will know if your socket has a removable faceplate if it has a BT or Openreach logo, and a separate removable faceplate covering the bottom half (see examples for sockets with a removable face plates below). You can then remove the faceplate to isolate the internal wiring in the building as per the steps below:
If you do not have a master socket like this (meaning your phone installation dates to before ~1986), try connecting the broadband splitter to the first socket where the line comes in to the building, and connect the router to the splitter.   |
 |
Step 4: Swap ShopIf you have any spares of any of the relevant parts, try swapping them. If you don't have spares you will need to call us anyway, but it is worth checking cables are all plugged in firmly and trying turning equipment off and back on again. If there is equipment supplied as part of the service and you are not using it, then you should test with the supplied equipment. |
 |
Step 5: DiagnosticsThere are various tools and diagnostics that are available via the Control Pages, please see:
These may help say whether the fault it likely to be at the customer side or the phone line side |
 |
Step 6: Calling usOnce you call support we may ask you various questions and ask you to carry out tests. These should simply be things like plugging in or unplugging equipment, changing leads around, turning things off and on again, etc. They are not normally anything complicated or technical. Depending on the circumstances we will report the fault in to BT to resolve an issue with the line. We have staff that are well practiced in dealing with BT and chasing faults. If BT do not diagnose a problem initially, before getting a BT engineer sent out, we may need to send you a test router to eliminate all wiring and equipment at your end as the cause of the problem. This is provided with simple instructions on how to plug it in, and is pre-programmed and tested before being shipped to you. If this confirms the problem is within the BT network we will arrange a BT engineer. See our Contact Page for contact details. Out of hours you can SMS or connect to IRC. |