L2TP Client: pfSense: Difference between revisions
Created page with "__NOTOC__<indicator name="L2TP">link=:Category:Incoming_L2TP|30px|Back up to the Incoming L2TP Category</indicator> Category:Incoming_L2TP [https:/..." |
m →Step 1 |
||
| (4 intermediate revisions by 2 users not shown) | |||
| Line 1: | Line 1: | ||
__NOTOC__<indicator name="L2TP">[[File:Menu-L2TP.svg|link=:Category: |
__NOTOC__<indicator name="L2TP">[[File:Menu-L2TP.svg|link=:Category:Incoming L2TP|30px|Back up to the Incoming L2TP Category]]</indicator> |
||
[[Category: |
[[Category:Incoming L2TP]] |
||
[https://www.pfsense.org/ pfSense] is an open source firewall distribution, built on top of the FreeBSD Operating System. |
[https://www.pfsense.org/ pfSense] is an open source firewall distribution, built on top of the FreeBSD Operating System. |
||
| Line 6: | Line 6: | ||
It is possible to create a L2TP client interface and route both IPv4 and IPv6 traffic over it. |
It is possible to create a L2TP client interface and route both IPv4 and IPv6 traffic over it. |
||
== Configuration Guide == |
|||
=== Step 1 === |
|||
The first step is to add a new L2TP Interface to pfSense. |
|||
This is done by navigating from Interfaces ⟶ (assign), then clicking on 'PPPs' and then press the '+ Add' button. |
|||
[[File:PfSense - Add PPP Interface.png|800px]] |
|||
On the next screen, configure the new interface to use L2TP: |
|||
# Set the '''Link Type''' to L2TP |
|||
# Set the outgoing '''Link Interface''' (most likely WAN) |
|||
# Set the '''Username''' to your AAISP login |
|||
# Set the '''Password''' to you AAISP password - as seen on the 'Broadband Circuit Details' page on [[Category:Control Pages|control.aa.net.uk]] |
|||
# Set the '''Gateway IP''' to '194.4.172.12' - by using an IP address you can avoid performing a DNS lookup, and having to ensure DNS works before and after the tunnel comes up. - though the IP can change - so we'd suggest actually using l2tp.aa.net.uk |
|||
# No Local IP Address is required - it will be chosen automatically |
|||
[[File:PfSense - Define PPP Configuration.png|800px]] |
|||
When you are finished, press '''Save''' at the bottom of the screen. |
|||
=== Step 2 === |
|||
Then go back to the Interfaces ⟶ (assign) main menu. The next step is to assign the interface and configure it. |
|||
Press the '+ Add' button next to the new L2TP0 interface: |
|||
[[File:PfSense - Assign Interface.png|800px]] |
|||
The interface can then be configured to use IPv4 and/or IPv6: |
|||
# I used the '''description'''/name 'L2TP' for my interface |
|||
# Set the '''IPv4 Configuration Type''' to 'L2TP' |
|||
# Set the '''IPv6 Configuration Type''' to 'SLAAC' - you don't actually need a global IPv6 address on the interface at all - it will just use Link Local addressing, but setting to SLAAC seems to enable IPv6 on the interface without causing any problems |
|||
When you are finished, press '''Save''' at the bottom of the screen. |
|||
Latest revision as of 11:26, 8 December 2022
pfSense is an open source firewall distribution, built on top of the FreeBSD Operating System.
It is possible to create a L2TP client interface and route both IPv4 and IPv6 traffic over it.
Configuration Guide
Step 1
The first step is to add a new L2TP Interface to pfSense.
This is done by navigating from Interfaces ⟶ (assign), then clicking on 'PPPs' and then press the '+ Add' button.
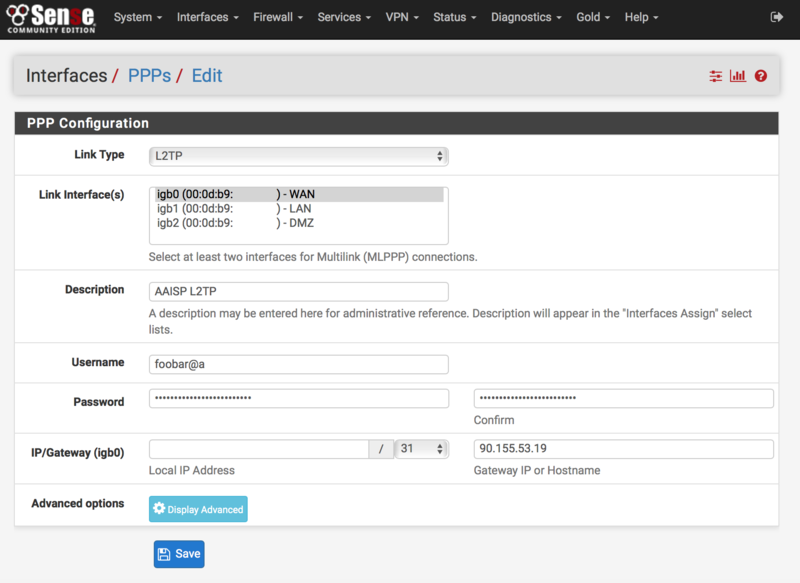
On the next screen, configure the new interface to use L2TP:
- Set the Link Type to L2TP
- Set the outgoing Link Interface (most likely WAN)
- Set the Username to your AAISP login
- Set the Password to you AAISP password - as seen on the 'Broadband Circuit Details' page on
- Set the Gateway IP to '194.4.172.12' - by using an IP address you can avoid performing a DNS lookup, and having to ensure DNS works before and after the tunnel comes up. - though the IP can change - so we'd suggest actually using l2tp.aa.net.uk
- No Local IP Address is required - it will be chosen automatically
When you are finished, press Save at the bottom of the screen.
Step 2
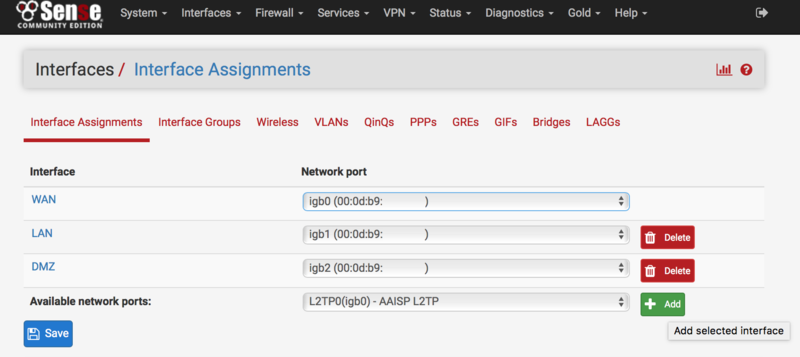
Then go back to the Interfaces ⟶ (assign) main menu. The next step is to assign the interface and configure it.
Press the '+ Add' button next to the new L2TP0 interface:
The interface can then be configured to use IPv4 and/or IPv6:
- I used the description/name 'L2TP' for my interface
- Set the IPv4 Configuration Type to 'L2TP'
- Set the IPv6 Configuration Type to 'SLAAC' - you don't actually need a global IPv6 address on the interface at all - it will just use Link Local addressing, but setting to SLAAC seems to enable IPv6 on the interface without causing any problems
When you are finished, press Save at the bottom of the screen.


