
L2TP Client: Linux: Difference between revisions
Content deleted Content added
Created page with "__NOTOC__<indicator name="L2TP">link=:Category:Incoming_L2TP|30px|Back up to the Incoming L2TP Category</indicator> Category:Incoming_L2TP == Linux..." |
Formatting clean up |
||
| (17 intermediate revisions by 4 users not shown) | |||
| Line 1: | Line 1: | ||
__NOTOC__<indicator name="L2TP">[[File:Menu-L2TP.svg|link=:Category: |
__NOTOC__<indicator name="L2TP">[[File:Menu-L2TP.svg|link=:Category:Incoming L2TP|30px|Back up to the Incoming L2TP Category]]</indicator> |
||
[[Category: |
[[Category:Incoming L2TP]] |
||
| ⚫ | |||
See further below for CLI based xl2tpd manual instructions |
|||
=Ubuntu / Network Manager = |
|||
If you'd rather not set this all up with the CLI then you can use Network Manager instead. |
|||
First, install the packages for the l2tp client and the network manager controls: |
|||
apt install xl2tpd network-manager-l2tp network-manager-l2tp-gnome |
|||
If the packages are not found, you may need to add some PPA's, eg one or both of these may be required: |
|||
sudo add-apt-repository ppa:nm-l2tp/network-manager-l2tp |
|||
sudo add-apt-repository universe |
|||
sudo apt-get update |
|||
Then, using Network Manager, create the L2TP connection: |
|||
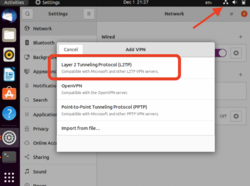
#Add a L2TP connection: (pic below) |
|||
##Click the Network icon on the task bar |
|||
##Click Settings |
|||
##Next to 'VPN', click the + icon |
|||
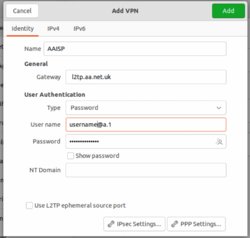
#Enter in the settings: (pic below) |
|||
##Name: anything, eg AAISP |
|||
##Type: Password |
|||
##User name: your login we gave you, eg xxx@a.1 |
|||
##Password: the password we gave you |
|||
##Click Apply |
|||
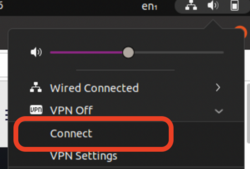
#Connect/disconnect via the network icon on the taskbar (pic below) |
|||
<gallery heights=250 widths=250 caption="Ubuntu/Network Manager pics"> |
|||
NetworkManagerL2TP1.png|Add a L2TP connection |
|||
NetworkManagerL2TP2.png|Enter in the settings |
|||
NetworkManagerL2TP3.png|Connect/disconnect |
|||
</gallery> |
|||
| ⚫ | |||
<ol> |
<ol> |
||
| Line 10: | Line 46: | ||
</ol> |
</ol> |
||
<li>Install xl2tpd and pppd on your Linux router.</li> |
<li>Install xl2tpd and pppd on your Linux router.</li> |
||
<li>Edit <code>/etc/xl2tpd/xl2tpd.conf</code> to contain the following:<br /> |
<li>Edit <code>/etc/xl2tpd/xl2tpd.conf</code> to contain the following (adjust to suit):<br /> |
||
<pre> |
|||
[lac aaisp] |
|||
lns = l2tp.aaisp.net.uk |
lns = l2tp.aaisp.net.uk |
||
require authentication = no |
require authentication = no |
||
pppoptfile = /etc/ppp/options.aaisp |
pppoptfile = /etc/ppp/options.aaisp |
||
;redial = yes |
|||
;redial timeout = 15 |
|||
;max redials = 9999 |
|||
;autodial = yes |
|||
</pre> |
|||
<li>Create <code>/etc/ppp/options.aaisp</code> containing the following (obviously change the name and password to match your L2TP login details):<br /> |
<li>Create <code>/etc/ppp/options.aaisp</code> containing the following (obviously change the name and password to match your L2TP login details):<br /> |
||
<pre> |
|||
<code>+ipv6<br /> |
|||
+ipv6 |
|||
ipv6cp-use-ipaddr |
ipv6cp-use-ipaddr |
||
name xyz@a.X |
name xyz@a.X |
||
password Your_xyz@A.X_password |
password Your_xyz@A.X_password |
||
| ⚫ | |||
noauth |
|||
| ⚫ | |||
<li>Create the xl2tpd control file:<br /> |
<li>Create the xl2tpd control file:<br /> |
||
<code>mkdir -p /var/run/xl2tpd<br /> |
<code>mkdir -p /var/run/xl2tpd<br /> |
||
| Line 29: | Line 73: | ||
<code>echo "c aaisp" > /var/run/xl2tpd/l2tp-control</code></li> |
<code>echo "c aaisp" > /var/run/xl2tpd/l2tp-control</code></li> |
||
</ol> |
</ol> |
||
This should give you a new PPP device which encapsulates the L2TP connection. |
*This should give you a new PPP device which encapsulates the L2TP connection. |
||
*You will then need to figure out what you want to route up the tunnel. |
|||
=== Troubleshooting === |
|||
Logs are written /var/log/daemon.log |
|||
If you see "No such tunnel", you might want to try restarting the daemon |
|||
Latest revision as of 15:18, 26 September 2025
See further below for CLI based xl2tpd manual instructions
Ubuntu / Network Manager
If you'd rather not set this all up with the CLI then you can use Network Manager instead.
First, install the packages for the l2tp client and the network manager controls:
apt install xl2tpd network-manager-l2tp network-manager-l2tp-gnome
If the packages are not found, you may need to add some PPA's, eg one or both of these may be required:
sudo add-apt-repository ppa:nm-l2tp/network-manager-l2tp
sudo add-apt-repository universe
sudo apt-get update
Then, using Network Manager, create the L2TP connection:
- Add a L2TP connection: (pic below)
- Click the Network icon on the task bar
- Click Settings
- Next to 'VPN', click the + icon
- Enter in the settings: (pic below)
- Name: anything, eg AAISP
- Type: Password
- User name: your login we gave you, eg xxx@a.1
- Password: the password we gave you
- Click Apply
- Connect/disconnect via the network icon on the taskbar (pic below)
- Ubuntu/Network Manager pics
-
 Add a L2TP connection
 -
 Enter in the settings
 -
 Connect/disconnect


Linux / xl2tpd
- Ensure the following kernel options are set or the corresponding modules are available:
CONFIG_PPPOL2TPCONFIG_L2TP- Install xl2tpd and pppd on your Linux router.
- Edit
/etc/xl2tpd/xl2tpd.confto contain the following (adjust to suit):
[lac aaisp]
 lns = l2tp.aaisp.net.uk
 require authentication = no
 pppoptfile = /etc/ppp/options.aaisp
 ;redial = yes
 ;redial timeout = 15
 ;max redials = 9999
 ;autodial = yes
- Create
/etc/ppp/options.aaispcontaining the following (obviously change the name and password to match your L2TP login details):
+ipv6
ipv6cp-use-ipaddr
name xyz@a.X
password Your_xyz@A.X_password
noauth
- Create the xl2tpd control file:
mkdir -p /var/run/xl2tpd

touch /var/run/xl2tpd/l2tp-control - Start the xl2tpd service (for systemd, use service command for older RC systems):
systemctl start xl2tpd - Tell the daemon to connect to aaisp:
echo "c aaisp" > /var/run/xl2tpd/l2tp-control
- This should give you a new PPP device which encapsulates the L2TP connection.
- You will then need to figure out what you want to route up the tunnel.
Troubleshooting
Logs are written /var/log/daemon.log If you see "No such tunnel", you might want to try restarting the daemon