Email on Apple Mail: Difference between revisions
Appearance
Content deleted Content added
Created page with "These notes are based on version 11.2 When Mail is first started it will ask for your email account type, click 'Other Mail Account'... and follow these notes: #Click Other..." |
No edit summary |
||
| (15 intermediate revisions by 4 users not shown) | |||
| Line 1: | Line 1: | ||
<indicator name="Faults">[[File:Menu-email.svg|link=:Category:Email Clients|30px|Back up to the Email Clients Category]]</indicator> |
|||
These notes are based on version |
These notes are based on version 13.5.2 2023 |
||
When Mail is first started it will ask for your email account type, click 'Other Mail |
When Mail is first started it will ask for your email account type, click 'Other Mail Account…' and follow these notes: |
||
If adding a new mail account to Mail, then go to: Mail - Add Account… - Other Mail Account - Continue... and follow these notes |
|||
#Click Other mail account, then Continue |
#Click Other mail account, then Continue |
||
| Line 12: | Line 15: | ||
##Click Sign in |
##Click Sign in |
||
##Untick 'Notes' if you don't need to use this account for notes. |
##Untick 'Notes' if you don't need to use this account for notes. |
||
#Email should now work, Apple Mail doesn't ask for security settings but it should work out what to do itself automatically. If not untick 'Automatically Manage Connection Settings' |
|||
#Then check authentication is set to 'password', check encryption is set to 'STARTTLS/SSL' and incoming port is '993', outgoing is set to '587'. |
|||
'''Note:''' Some Apple Mail App version default to emptying the Trash folder after 1 week. You may want to set this to Never in Account Settings |
|||
<div><ul> |
|||
Email should now load. |
|||
<li style="display: inline-block;vertical-align: top;"> [[File:Osxmailaccsetup.png|thumb|500px|caption|1. New Account -> Click on 'Other Account']] </li> |
|||
<li style="display: inline-block;vertical-align: top;"> [[File:Osxaddacc.png|thumb|500px|caption|2. Name, address and password]] </li> |
|||
<li style="display: inline-block;vertical-align: top;"> [[File:Osxsignerror.png|thumb|500px|caption|3. Set server settings]] </li> |
|||
<li style="display: inline-block;vertical-align: top;"> [[File:Osxmailsettings.png|thumb|500px|caption|4. Untick 'Automatically Manage Connection Settings']] </li> |
|||
<li style="display: inline-block;vertical-align: top;"> [[File:Osxmailfull.png|thumb|500px|caption|5. Check authentication, encryption and port numbers]] </li> |
|||
</ul></div> |
|||
[[File:Email-apple-mail-1.png|thumb|Name and address]] |
|||
[[File:Email-apple-mail-2-settings.png|thumb|Server settings]] |
|||
[[Category:Email Clients|Apple Mail]] |
[[Category:Email Clients|Apple Mail]] |
||
Latest revision as of 09:40, 14 September 2023
These notes are based on version 13.5.2 2023
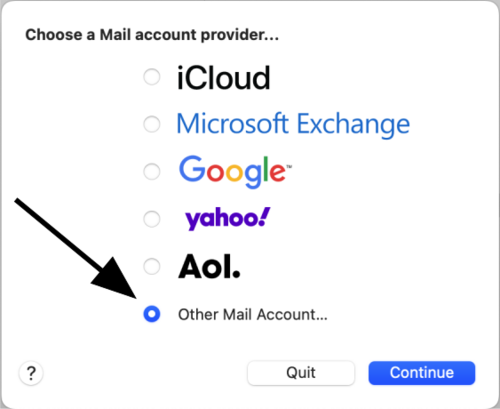
When Mail is first started it will ask for your email account type, click 'Other Mail Account…' and follow these notes:
If adding a new mail account to Mail, then go to: Mail - Add Account… - Other Mail Account - Continue... and follow these notes
- Click Other mail account, then Continue
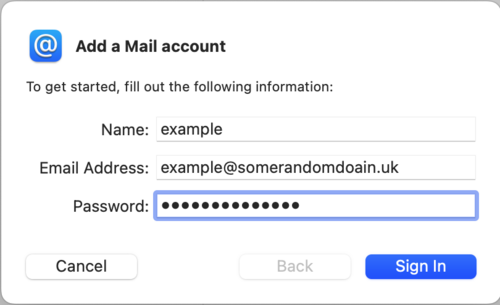
- Enter in your Name, email address and password, click Sign in.
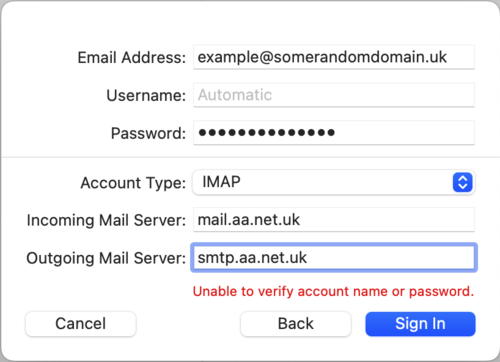
- It may give an error, that's fine, set some more settings:
- Account Type: IMAP (or POP if you prefer)
- Username: your full email address
- Incoming mail server: mail.aa.net.uk
- Outgoing mail server: smtp.aa.net.uk
- Click Sign in
- Untick 'Notes' if you don't need to use this account for notes.
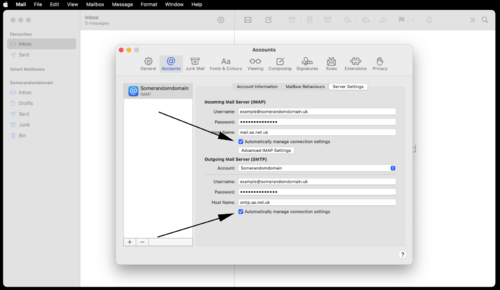
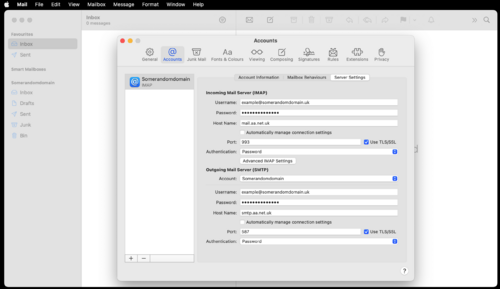
- Email should now work, Apple Mail doesn't ask for security settings but it should work out what to do itself automatically. If not untick 'Automatically Manage Connection Settings'
- Then check authentication is set to 'password', check encryption is set to 'STARTTLS/SSL' and incoming port is '993', outgoing is set to '587'.
Note: Some Apple Mail App version default to emptying the Trash folder after 1 week. You may want to set this to Never in Account Settings
